Author: Aarish

  • The Power of Refusal: Lessons Founders Discovered by Saying No

    The Power of Refusal: Lessons Founders Discovered by Saying No

    The Power of Refusal

    Introduction

    The entrepreneurial journey is often defined not only by the opportunities seized but also by the opportunities declined. For founders, the power of refusal can shape a business as profoundly as the most celebrated yes. Behind every company that stands the test of time lies a series of pivotal refusals, moments when leaders chose principle over profit, focus over distraction, and long-term vision over short-term wins.

    While it may seem counterintuitive in a culture that glorifies growth at all costs, saying no can often be the catalyst for authentic success. It is a safeguard that keeps businesses aligned with their values, protects founders from burnout, and ensures that companies grow in the right direction. This article explores the real-life experiences of founders across diverse industries who discovered invaluable lessons by refusing tempting yet misaligned opportunities.

    The Clarity of Purpose That Comes From Saying No

    One of the most powerful benefits of saying no as a founder is the clarity it brings. When every appealing offer is accepted, businesses risk becoming unfocused, losing sight of the very purpose that drew their first customers. Founders who practice the discipline of refusal often discover that their vision sharpens, enabling them to double down on what truly distinguishes them.

    Clarity not only strengthens brand identity but also builds trust. Customers, clients, and even employees recognize when a company stands firm in its mission. This consistency communicates reliability and authenticity, two qualities that often matter more than the latest product or trend. The power of refusal or saying no is not just a decision; it is a statement of values.

    The freedom to uphold vision by rejecting shortcuts:

    Saying no also brings freedom. Adrian Czarnoleski, an SEO consultant, recalled a turning point in his career when the opportunity to scale quickly came at the cost of his philosophy:

    “One tipping point for me was when I was asked to pass on the opportunity to partner with a larger online agency. On paper, it was a dream: access to their list, resources in the middle, and an express pass to scale. The problem? I’d need to sacrifice the ability to have full control over how I worked and would need to transition into the ‘churn and burn’ approach for SEO that didn’t sit right with me.”

    Adrian’s refusal to compromise on quality allowed him to select clients who valued long-term, meaningful results. While the decision meant slower growth initially, it ultimately became the very reason his business thrived. His story is a testament that not all glittering opportunities are truly golden, and that true progress often comes from defending the noes, not chasing the yeses.

    The discipline of saying no as a financial safeguard:

    Saying no doesn’t just protect values, it can also protect the financial health of a business. Reem Khatib, a partner at Tax Law Advocates, explained how many founders mistake deferring bookkeeping or handling taxes themselves as a cost-saving measure, only to face serious consequences later.

    “Saying ‘no’ isn’t just a boundary, but a financial strategy. One of the most practical (and overlooked) tax-saving moves I advise founders to make is saying no to deferring bookkeeping and DIY tax prep. It feels cost-effective in the moment, but it’s the fastest route to misreporting income, triggering audits, and racking up penalties.”

    She recalled working with a founder who racked up a six-figure tax liability from misfiled returns and unreported income. With expert help, they managed to reduce the debt, but the stress and credit damage could have been avoided. Her story is a reminder that the real savings often come not from cutting corners, but from refusing short-term fixes that cost more in the long run.

    The courage to reclaim control by redefining dependence:

    Saying no can also mean choosing ownership over convenience. Jessica Rich, owner of Bona Dea Naturals, experienced this when she decided to step away from total reliance on Amazon.

    “A pivotal moment in my entrepreneurial journey came when I decided to say ‘no’ to building my business solely on Amazon, she shared. Early on, the platform felt like a dream, sales surged, and success seemed effortless. But that momentum came with instability: listings could vanish overnight, and her lack of control left her business vulnerable. What looked thriving on the surface was fragile beneath.”

    Jessica’s decision to move away from the seeming safety of Amazon was a leap of faith. It meant abandoning guaranteed revenue to build something truly her own—a dedicated online store featuring her products alongside other women-owned wellness brands she believed in. In doing so, she discovered that sustainable growth isn’t found in quick wins, but in building a foundation rooted in purpose, independence, and integrity. Her story reminds us that true success often begins with the courage to say no to what feels easy, and yes to what feels right.

    The power of saying no to protect customer trust:

    Revenue opportunities can be tempting, but not every yes aligns with long-term credibility. Meyr Aviv, Founder and CEO at iMoving, shared how refusing questionable partnerships helped his company build a stronger foundation.

    “One of the hardest lessons I’ve learned as a founder is that saying no can be more powerful than saying yes. Early in iMoving’s journey, we turned down requests to onboard moving companies that lacked transparency or had a history of complaints.”

    Turning down those partnerships meant walking away from easy revenue, but it reduced disputes by more than 30%, lowered costs, and increased customer satisfaction. For founders, his lesson is clear: every yes dilutes focus, but the right no builds trust and becomes the foundation for responsible growth. Meyr’s experience highlights that brand reputation often hinges not on what you take on, but on what you consciously reject.

    The innovation that comes from refusing inefficiency:

    Founders often imagine saying no as shutting doors, but in many cases it opens the way for better focus and innovation. Gregory Shein, CEO of Corcava, built his company on the principle of streamlining rather than complicating.

    “The best founders learn that saying ‘no’ is an act of discipline. Declining low-value opportunities protects trust by showing clients and partners that you stand for quality, not quantity. It also creates space for innovation, as teams can channel their focus into fewer, high-impact initiatives. Most importantly, it honors people, your employees and customers, by ensuring their efforts and investments are never wasted on distractions.”

    He emphasized that declining low-value opportunities protects trust and gives teams space to focus on high-impact work. For him, saying no to inefficiency is about honoring both customers and employees by ensuring their efforts aren’t wasted. His approach shows how deliberate refusal can create the space needed for meaningful innovation. His story demonstrates that discipline in refusal often becomes the pathway to clarity, efficiency, and more meaningful progress.

    Practical Strategies For Founders to Embrace The Power of No:

    Founders can learn from these stories by adopting strategies that help them recognize when to refuse opportunities:

    • Evaluate alignment: Ask whether the opportunity aligns with your mission, values, and vision.
    • Consider long-term impact: Short-term gains should not undermine long-term sustainability.
    • Protect differentiators: Guard the qualities that make your business unique.
    • Stay authentic: Refuse anything that forces you to compromise your integrity or culture.

    By implementing these practices, founders create businesses that thrive authentically, without chasing every shiny opportunity.

    Conclusion

    Saying no is not a weakness in business; it is a form of strength. For the founders highlighted here, each refusal became a cornerstone of growth, clarity, and reputation. From preserving legacies to defending values, their stories prove that the decisions we decline can be just as powerful as the ones we accept.

    Ultimately, the power of refusal lies in its ability to protect what matters most: vision, integrity, authenticity, and legacy. Founders who master the art of saying no discover that growth isn’t about chasing everything, it’s about choosing wisely, and sometimes bravely, to walk away.
  • How to Make Columns in Google Docs: A Step-by-Step Guide

    How to Make Columns in Google Docs: A Step-by-Step Guide

    how to make columns in google docs

    You’re editing a newsletter and need side-by-side text, but Google Docs shows everything in one block. Although it’s a powerful word processor, many still overlook the built-in feature for multiple columns. People often ask how to make columns in Google Docs, especially when formatting newsletters or brochures. The process is not difficult, but the column format feature can be difficult to find if you’re new to the layout menu.

    This step-by-step guide will show you how to add columns in Google Docs using the top menu, customize the spacing, adjust the width, and even go back to a single-column format if needed.

    What Are Columns in Google Docs Used For?

    Columns in Google Docs help organize information side-by-side, making content easier to read and visually appealing. This built-in feature allows for precise control over layout, spacing, and formatting options within your document. Users typically insert multiple columns to display content such as brochures, newsletters, or comparisons in a structured, two-column format. The ability to add columns to your Google Docs improves readability and helps format long text more efficiently. Unlike Microsoft Word, Google Docs allows for quick column customization using the top menu. Moreover, this tool is helpful when you want to format the text into two or three columns quickly, especially when you’re learning how to make columns in Google Docs efficiently.

    How to Make Columns in Google Docs

    To make columns in Google Docs, use the built-in column format feature from the top menu. This allows you to add columns to your Google document, organize information side-by-side, and easily improve readability with two or three-column layouts.

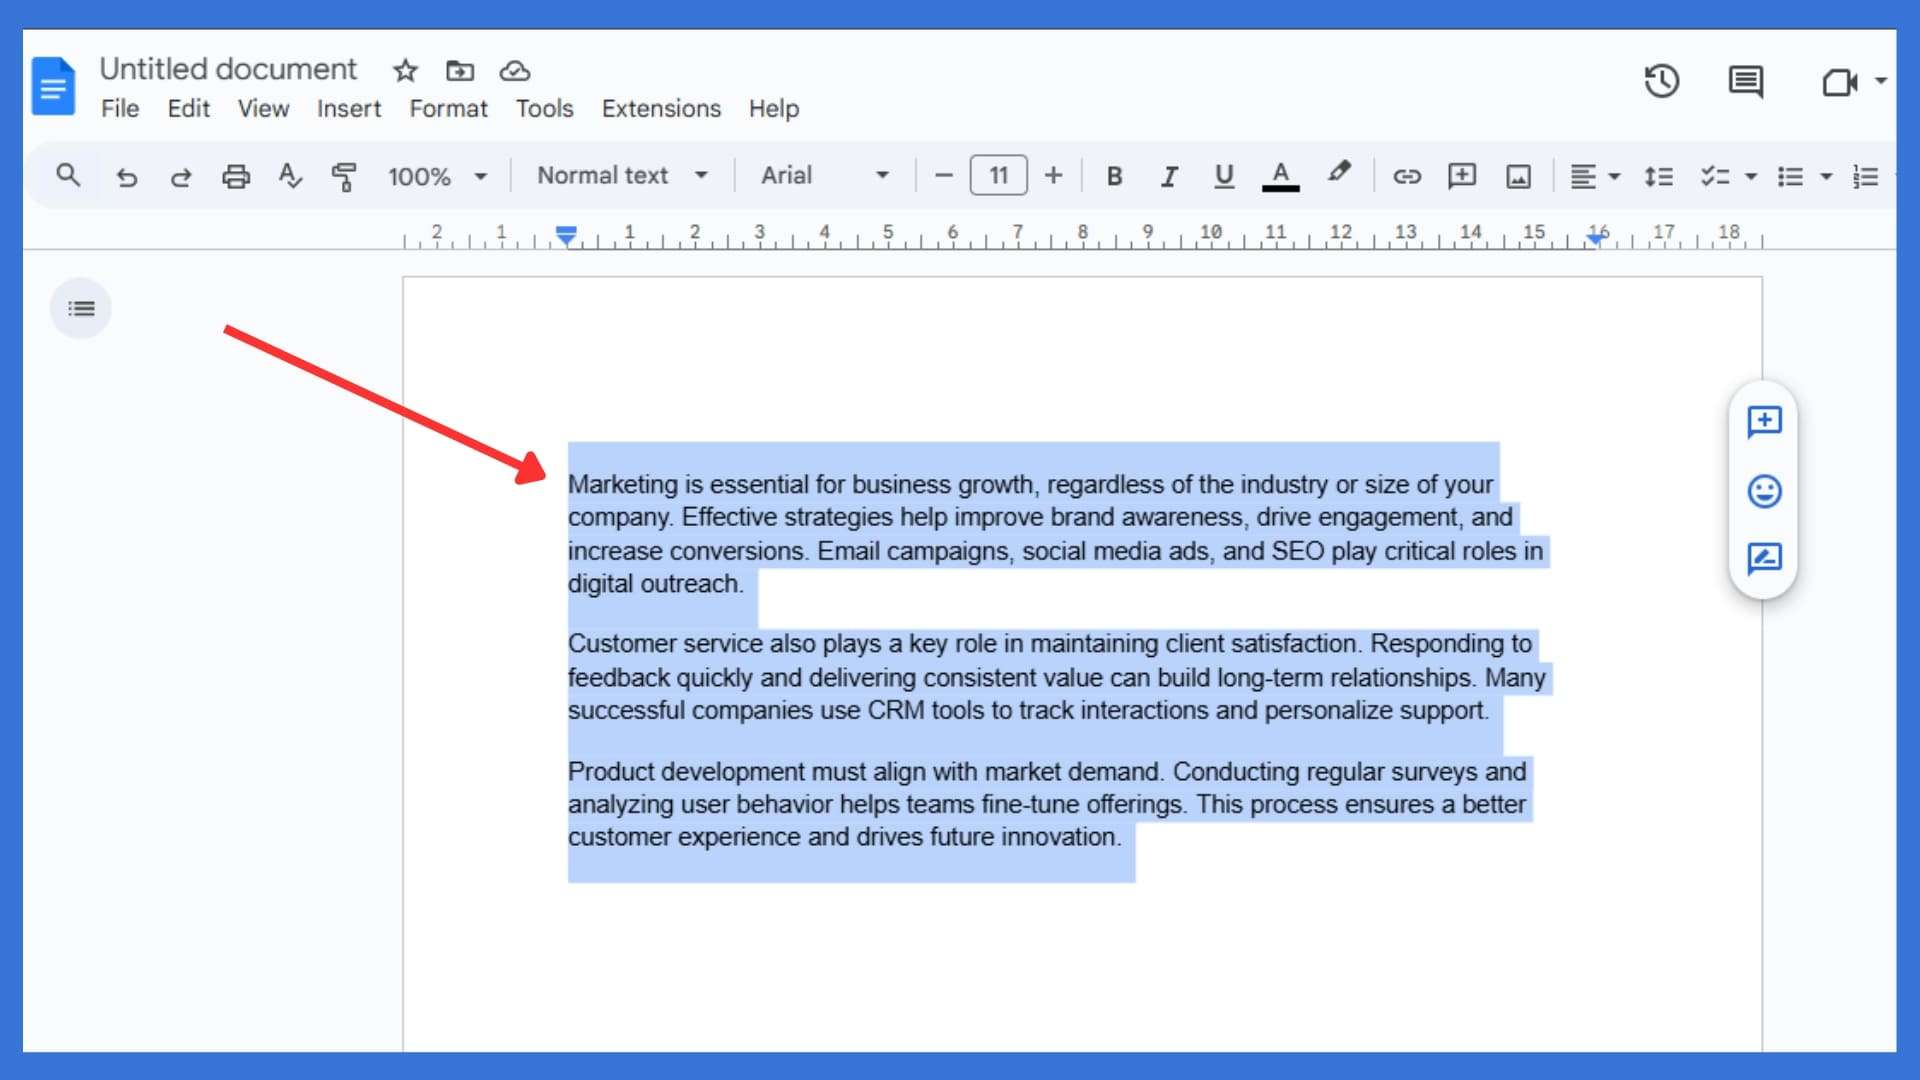
    1. Select the Text:

    Select the Text

    Highlight the text you want to format, then move your cursor to the top menu bar for formatting options.

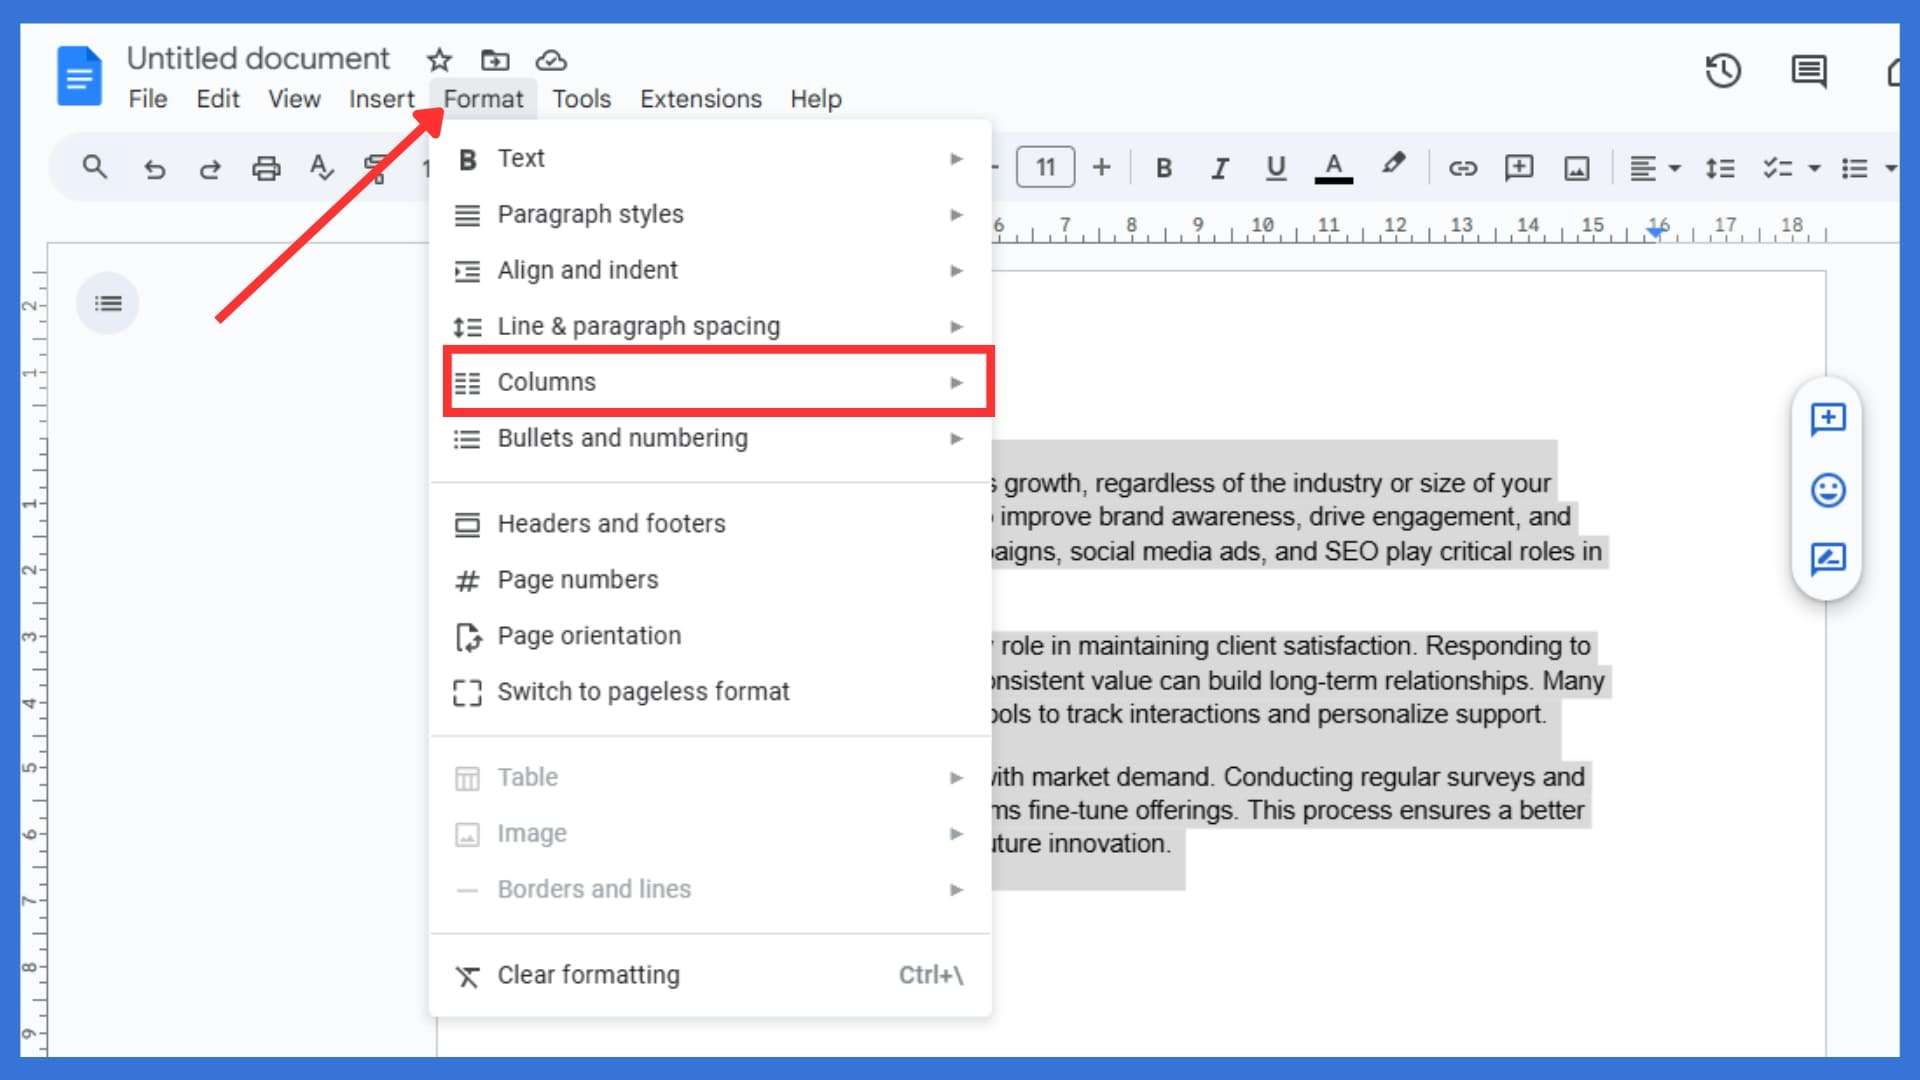
    2. Access the Columns Menu:

    Access the Columns Menu

    Click “Format” in the top menu, then hover over “Columns” to display the multiple-column layout options instantly.

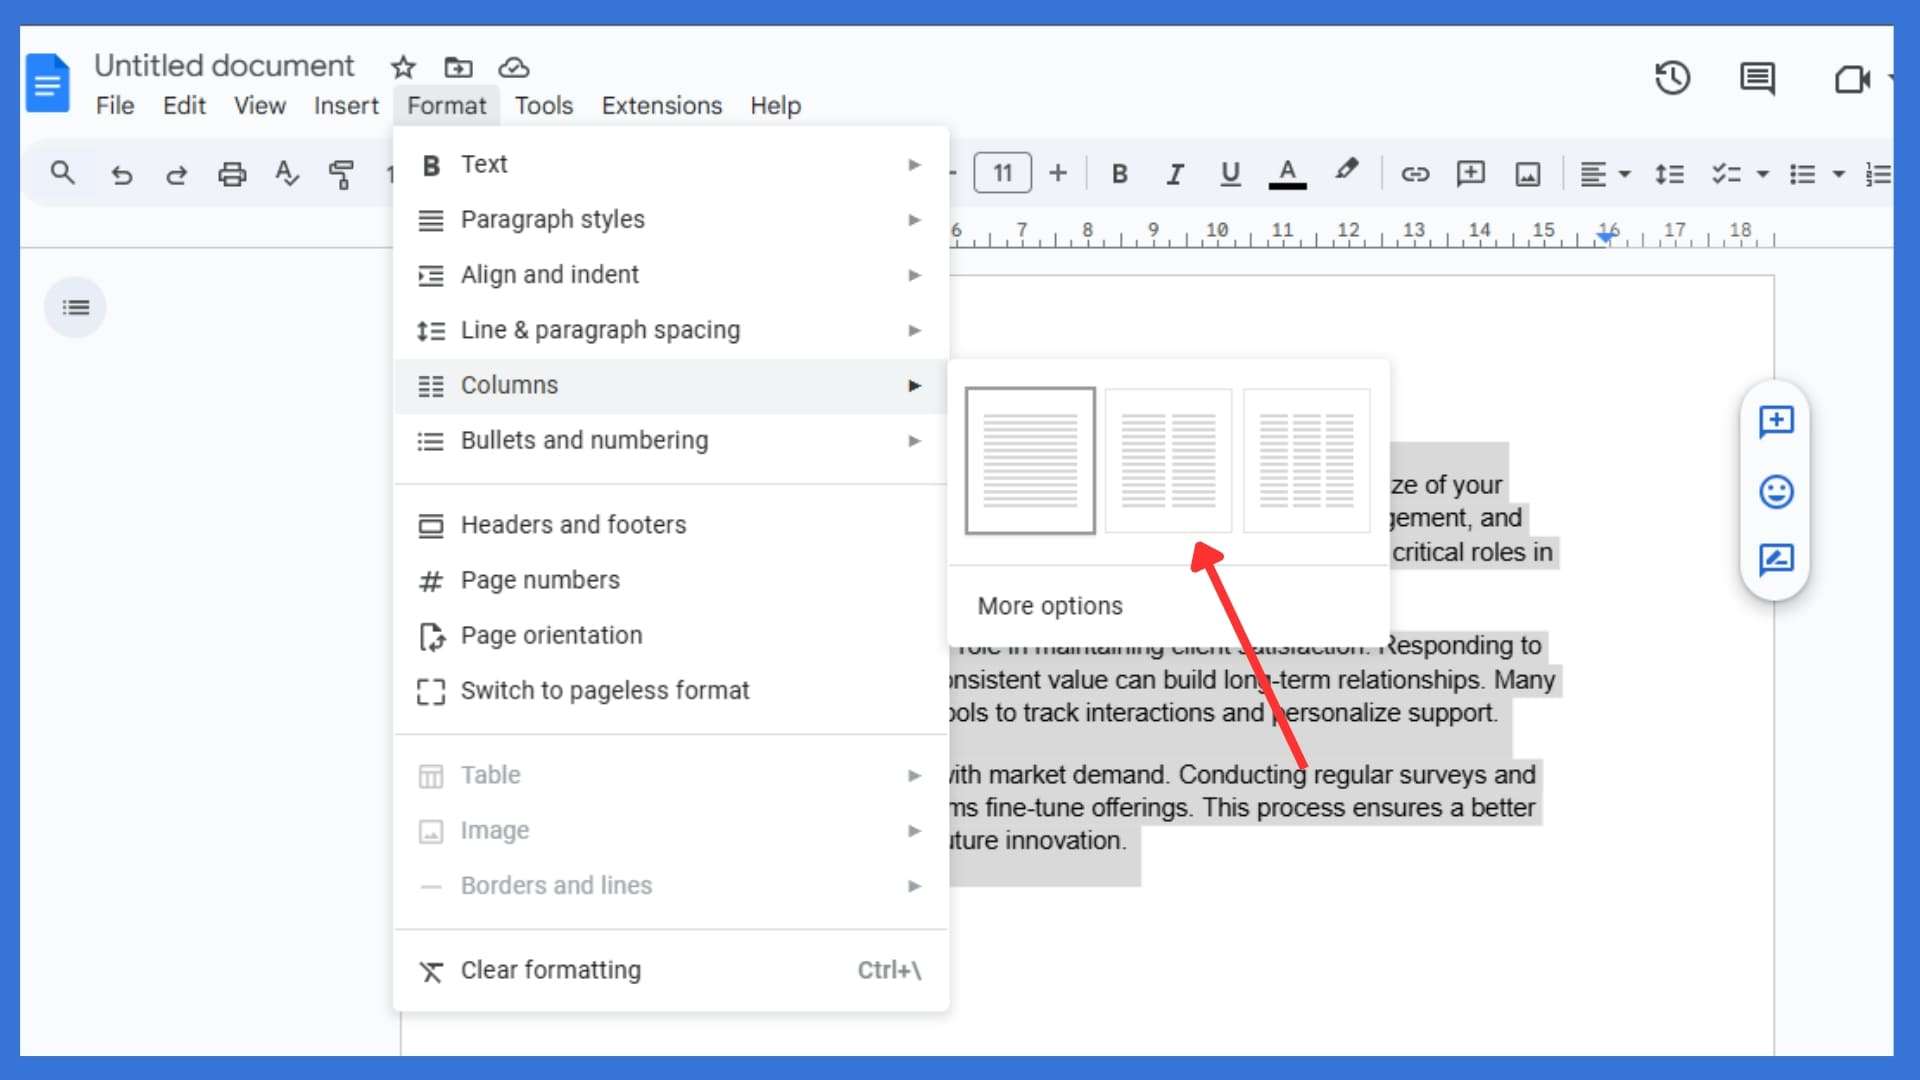
    3. Choose the Number of Columns:

    Choose the Number of Columns

    Select the number of columns you want, e.g., single column, two columns, or three columns, from the column format feature.

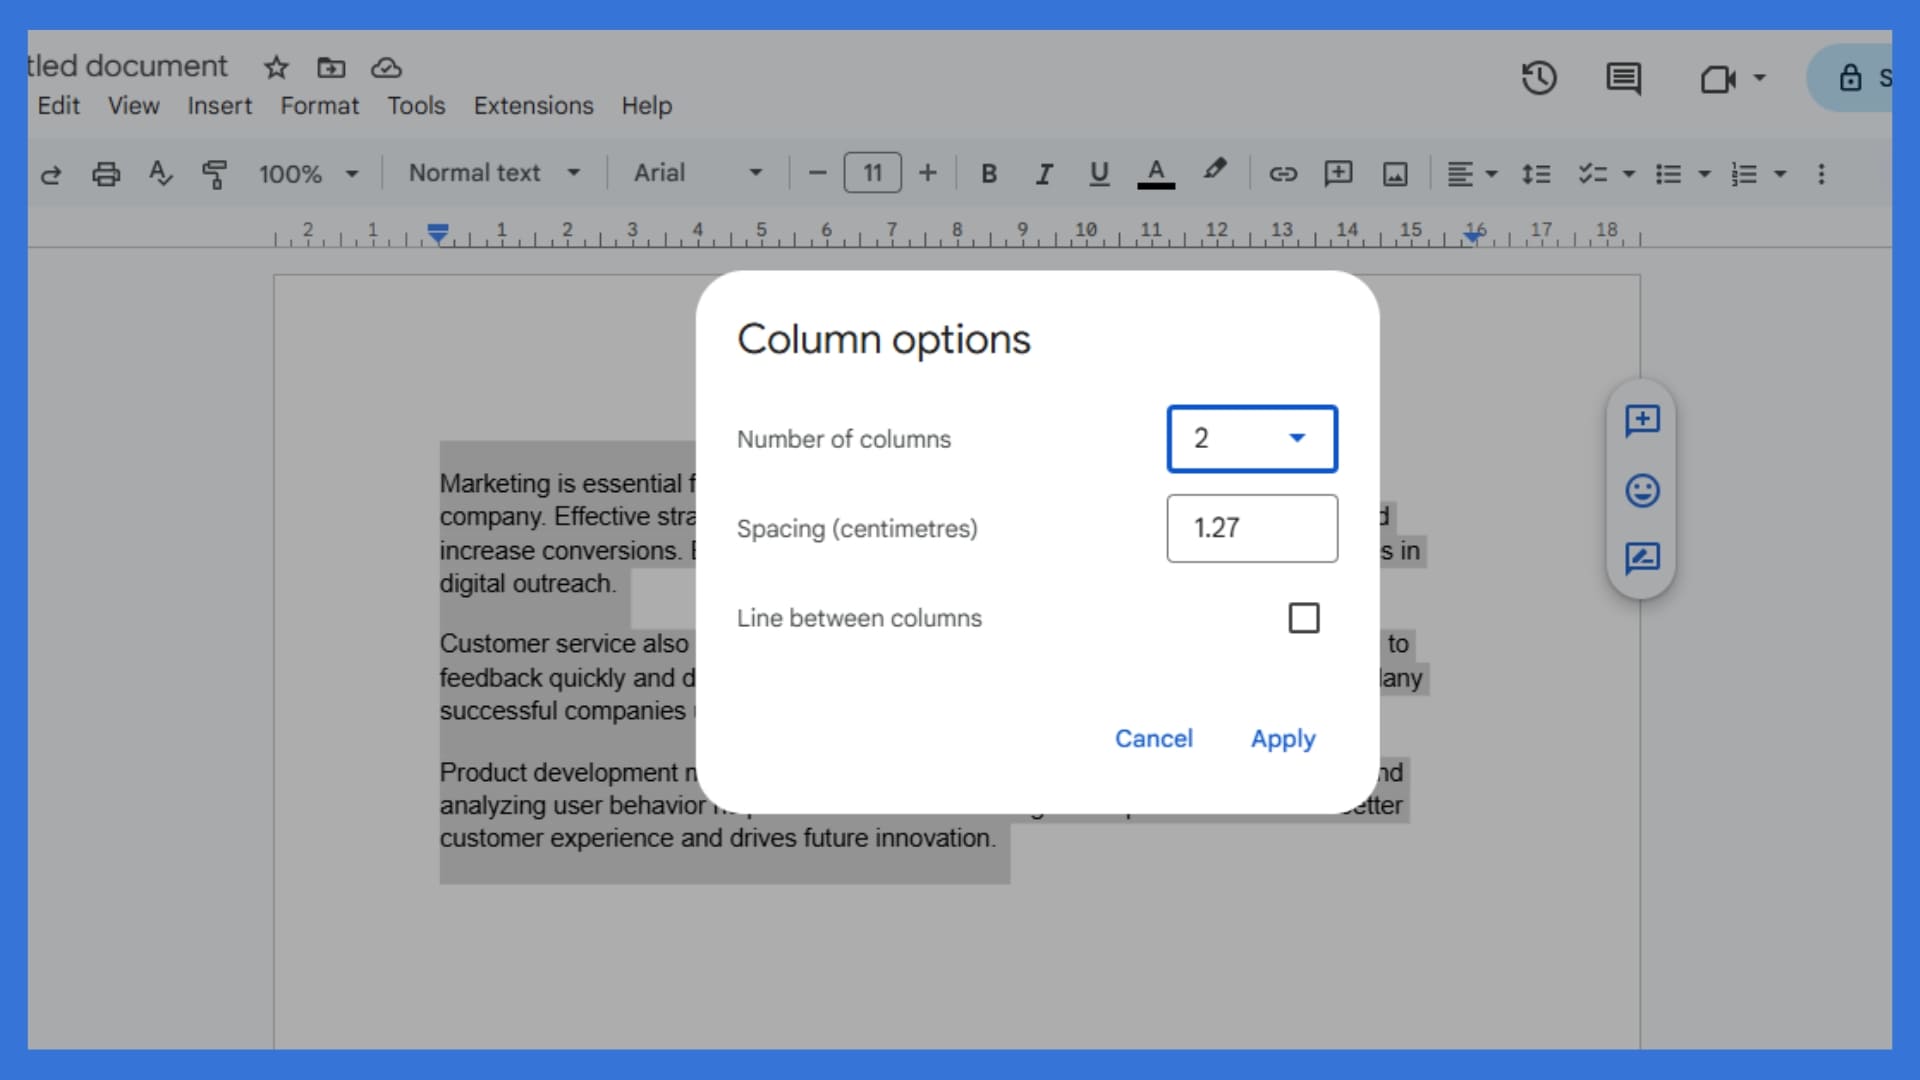
    4. Customize the Formatting (Optional):

    Customize the Formatting (Optional)

    Adjust the spacing, width, and line between columns using formatting options available under “More options” for better document design.

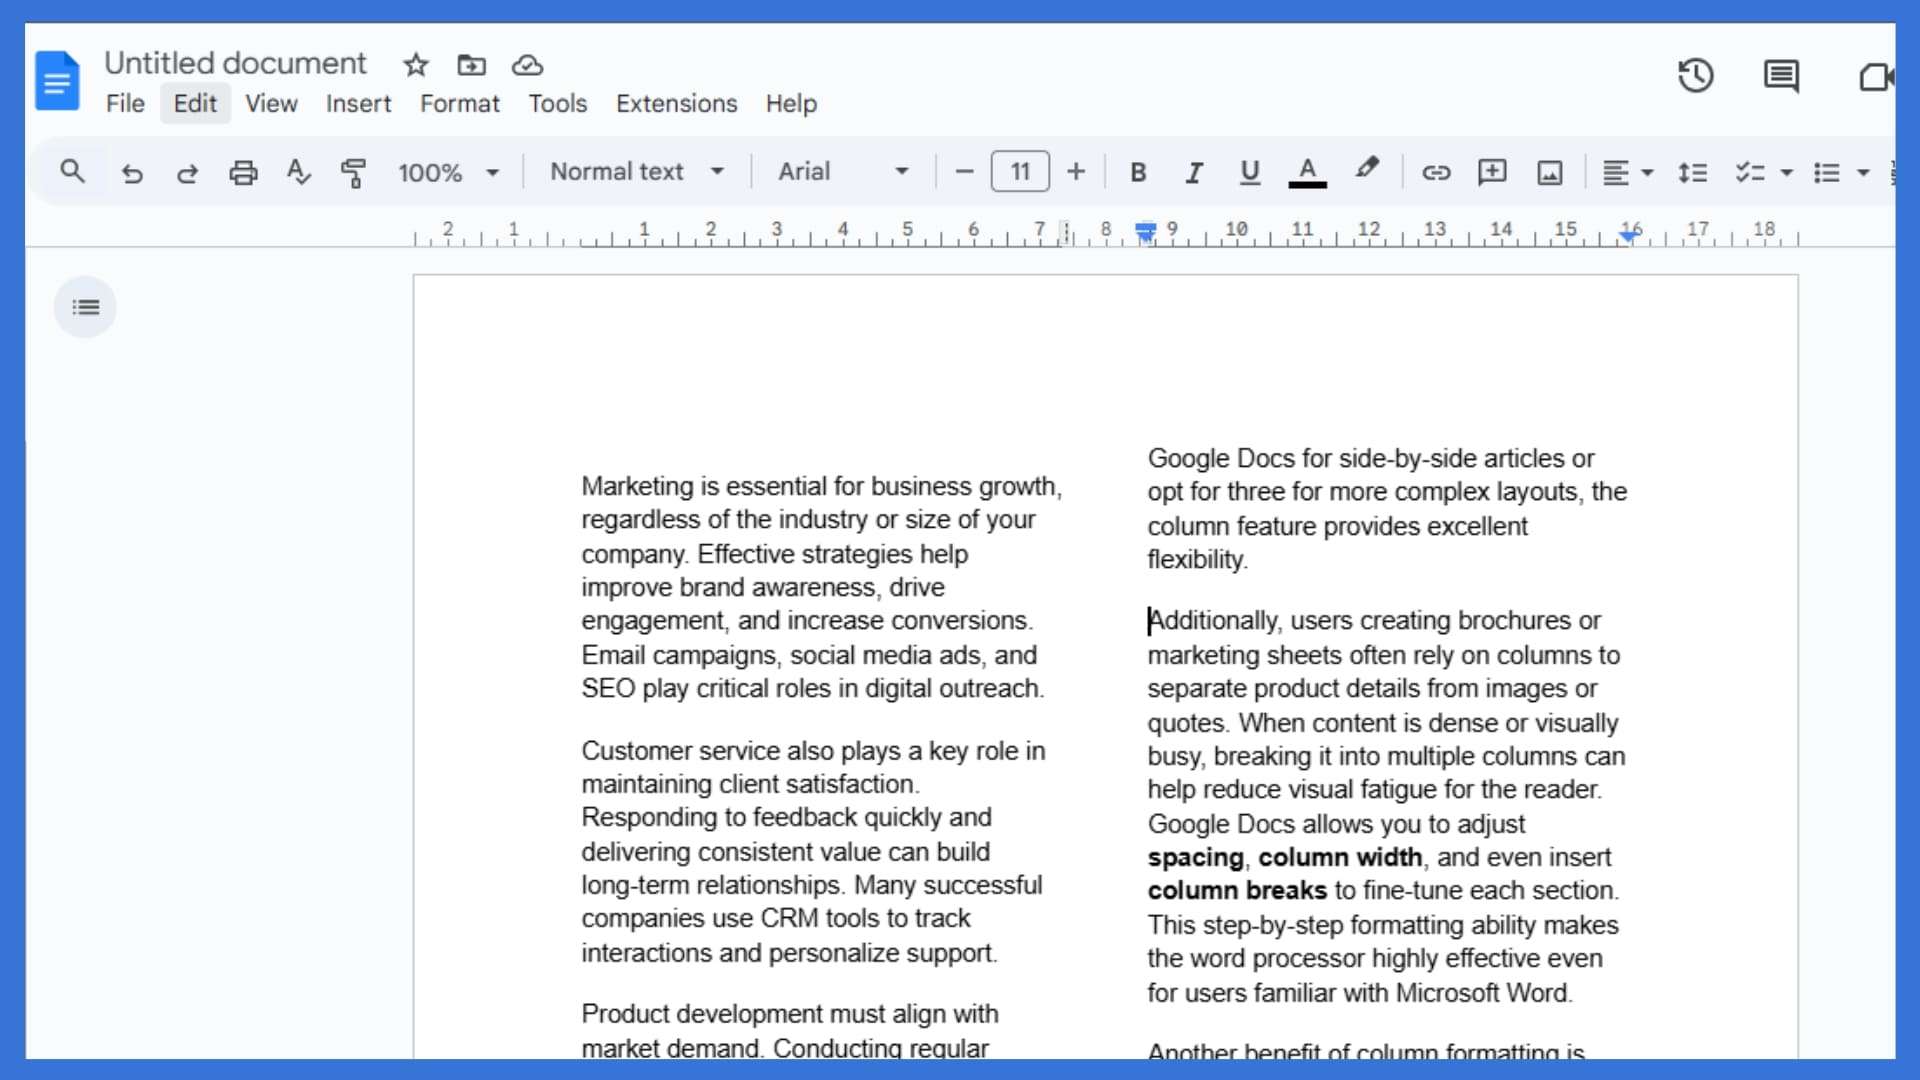
    5. Apply the Formatting: 

    Apply the Formatting

    Click “Apply” to insert the selected layout and transform your Google Doc into a more organized, side-by-side format.

    Other Methods for Making Columns in Google Docs

    Besides using the standard column format feature in the top menu, Google Docs offers several alternative methods for adding multiple columns. These options help you better organize information, enhance readability, and achieve a cleaner layout.

    Insert a Table:

    Select “Table” from the “Insert” option in the menu bar to create column-like alignment. This allows for precise control over column width and helps organize information in a structured format.

    Use Section Breaks with Layout Changes:

    Add section breaks and apply a different column format to specific parts of your document. This method supports mixing single-column and two-column layouts in the same Google Doc.

    Right-Click for Quick Edits:

    Right-click within the document layout to access quick formatting options, spacing, and alignment tools.

    Use the Google Docs Mobile App:

    On mobile devices, access column options via the formatting menu, albeit with limited functionality. Columns may appear differently in the mobile version due to screen constraints and layout responsiveness.

    If you’re looking for how to make columns in Google Docs while on mobile, expect fewer options compared to the desktop version.

    Conclusion

    Using columns in Google Docs adds a clean, appealing way to organize information side-by-side with ease. Whether you’re formatting a brochure, structuring two columns of text, or creating a multi-column newsletter layout, you’ll benefit from better document design, improved readability, and more precise control over spacing and alignment. The built-in feature allows for easy setup through the menu bar with just a few steps. Additionally, options like section breaks and column breaks offer advanced formatting capabilities for improved layout. So, now that you know how to make columns in Google Docs, do you prefer the two-column format for professional content, or do you still use single-column documents?

    FAQs

    1. Can I create columns in part of a Google Doc only?
    Yes, use section breaks to apply columns to selected sections without affecting the entire document.

    2. Is there a shortcut to open the column format in Google Docs?
    There’s no direct keyboard shortcut, but you can access it quickly via Format > Columns.

    3. Can I adjust the width of each column individually?
    No, Google Docs sets equal column widths by default and doesn’t support independent column resizing.

    4. How do I format a document with two or three columns?
    Go to Format > Columns and choose between two or three columns as needed for your layout.

    5. Can I use Google Docs to make a newspaper-style layout?
    Yes, by inserting two or three columns and adjusting spacing, you can simulate a newspaper layout.

  • How To Do Subscript In Google Docs

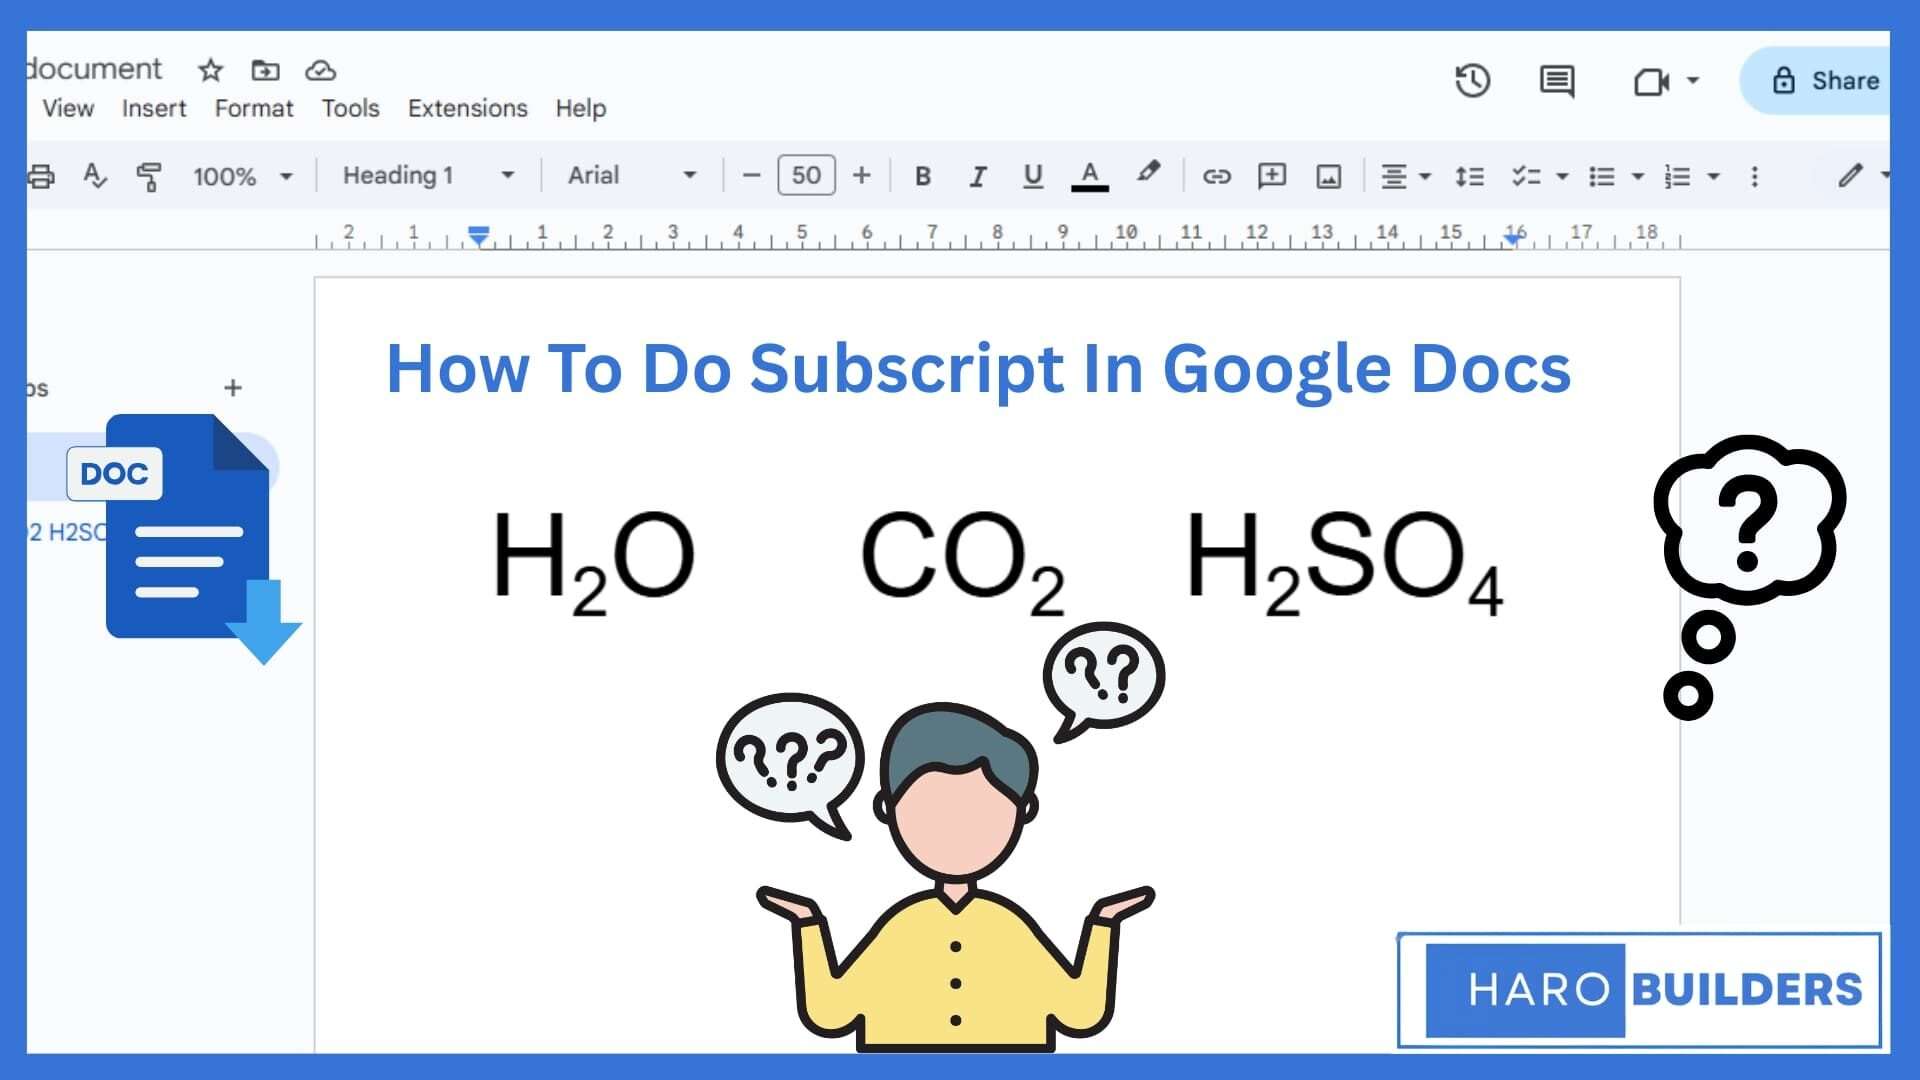
    How To Do Subscript In Google Docs

    how to do subscript in google docs

    Can’t figure out how to apply a subscript in Google Docs when working on chemical formulas or footnotes? Many users face formatting frustration when they want to add proper notations in a Google Doc, especially in mathematical equations. “How to do subscript in Google Docs” and “superscript or subscript shortcut” are frequently searched in the U.S. 

    The good news is that there’s more than one way to apply this essential formatting. Whether using a keyboard shortcut, formatting option, or special character, the method is straightforward. This article shares a complete step-by-step guide on how to format text using subscript and superscript.

    What Is A Subscript In Google Docs?

    A subscript in Google Docs refers to text formatted slightly below the standard text line. It is commonly used in chemical formulas, mathematical equations, or footnote references where specific values or symbols need lower placement. To apply a subscript, users can select the subscript format through the formatting option in the toolbar. Subscript text appears smaller and sits just below the baseline of normal text. You can format a subscript in a Google Doc using the keyboard shortcut or the format menu. Whether you’re writing equations or inserting symbols, subscript in Google Docs ensures your content is properly formatted and clear.

    How To Do Subscript In Google Docs

    Subscript and superscript formatting help enhance text for chemical formulas, mathematical equations, or footnote references. Whether you’re working on a PC or using the Google Docs app, the steps remain straightforward and effective.

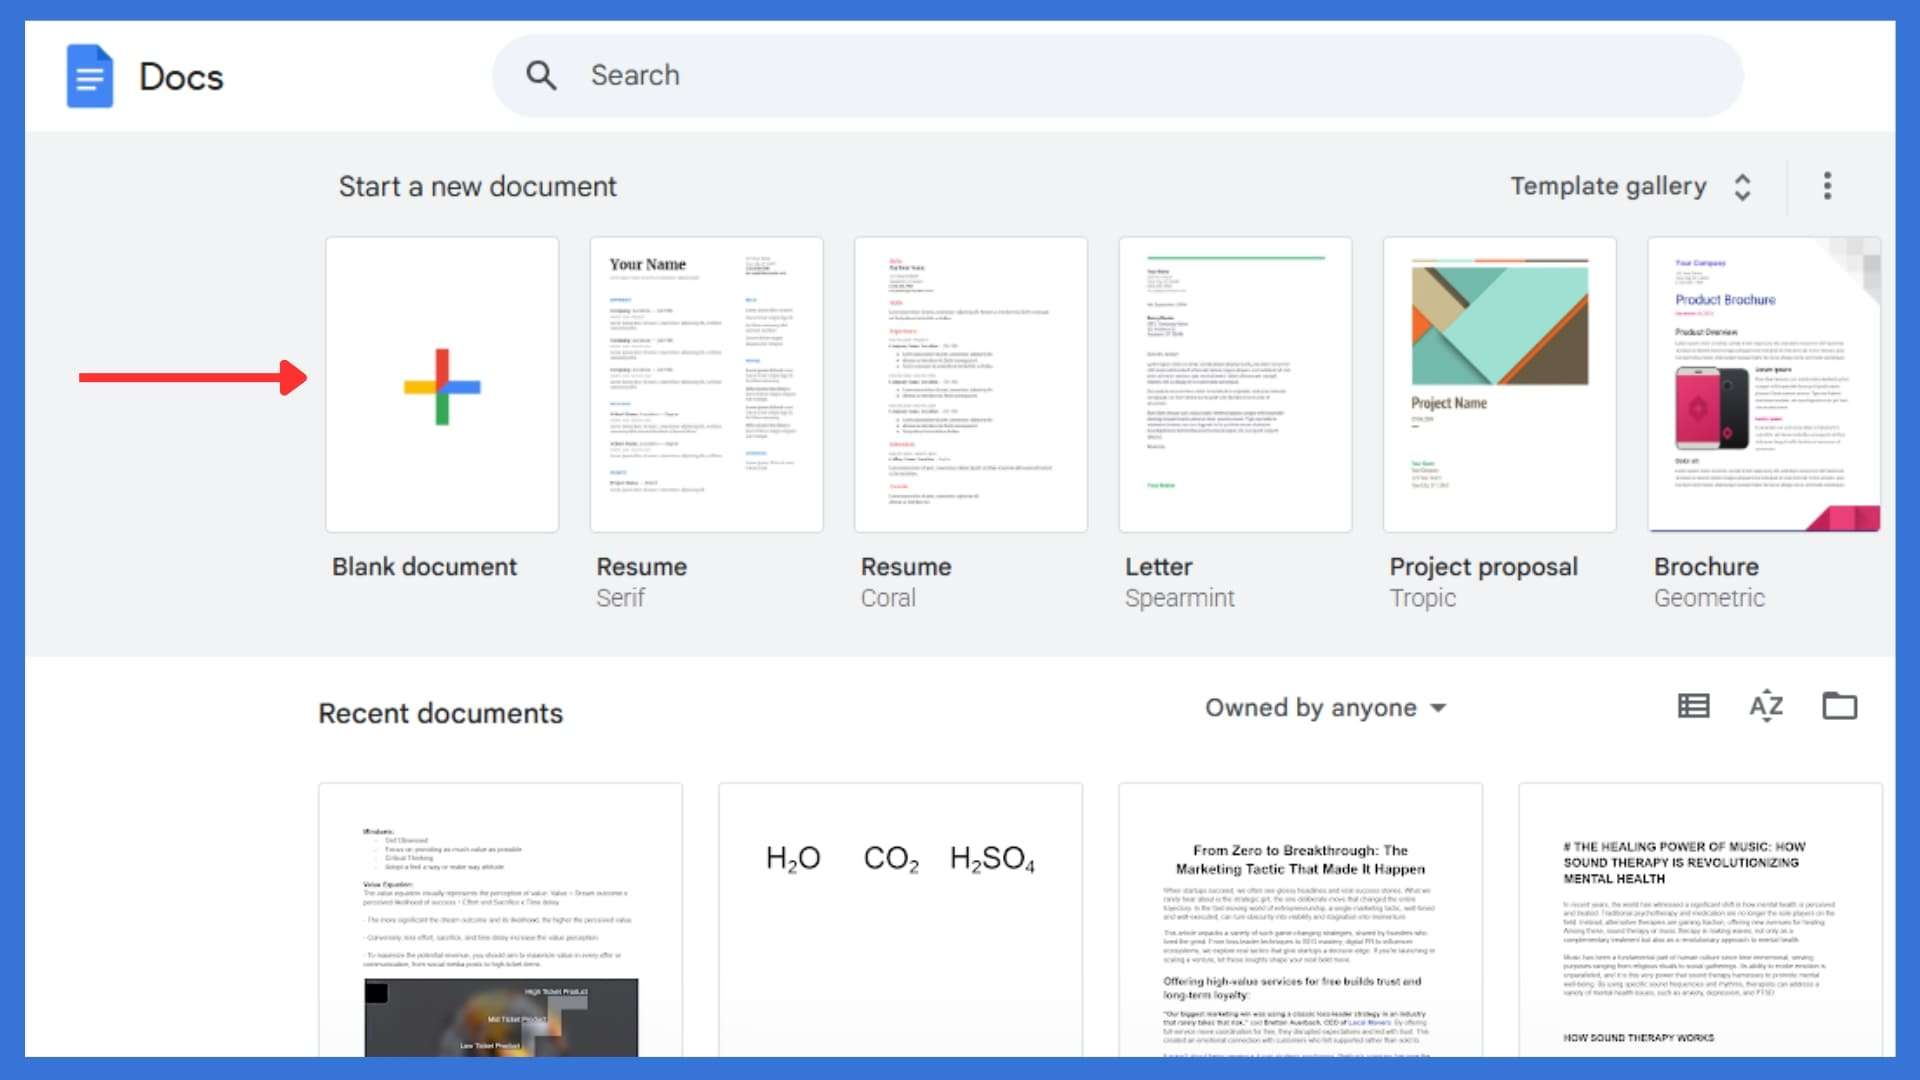
    Step 1: Open a Google Docs document:

    Open a Google Docs document

    Firstly, access Google Docs through your browser or the Google Docs mobile app for quick document editing.

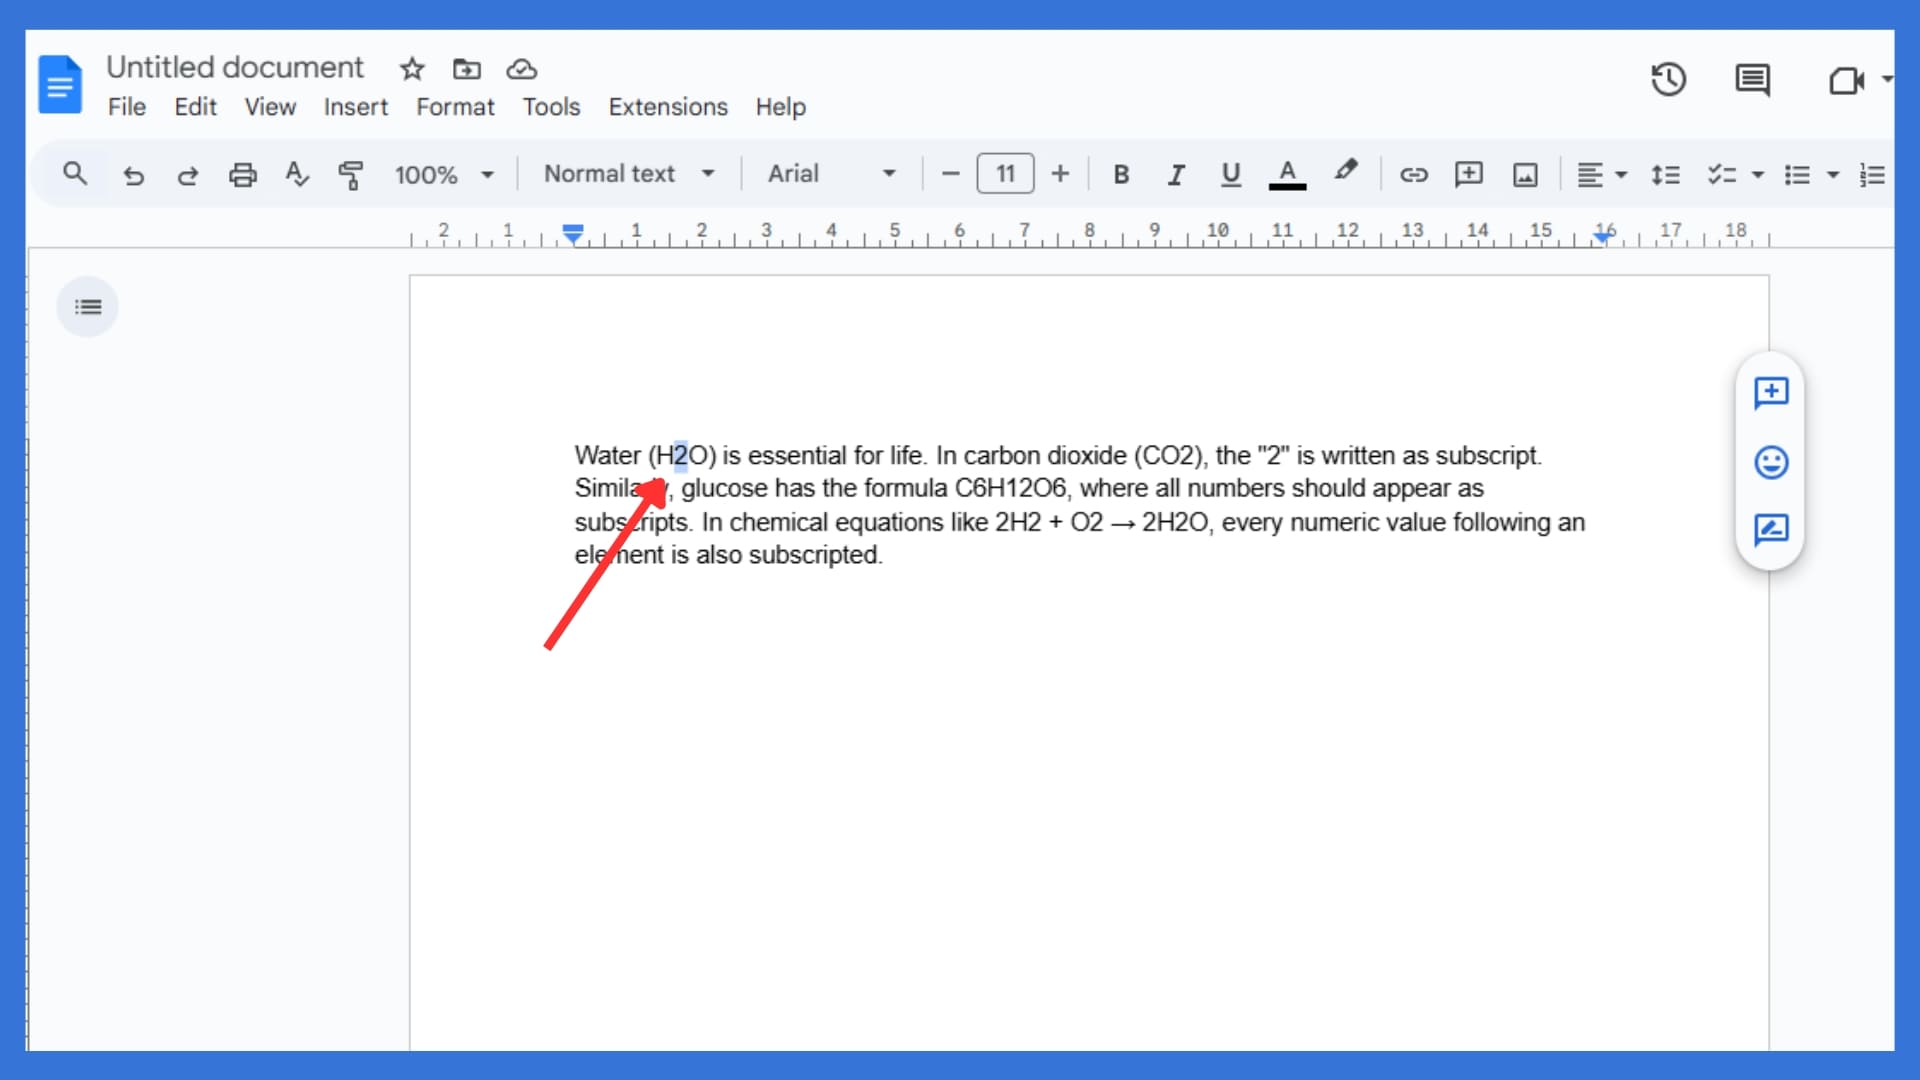
    Step 2: Highlight the Text:

    Highlight the Text

    Next, select the subscript text you want to modify by dragging the cursor over the relevant highlighted text.

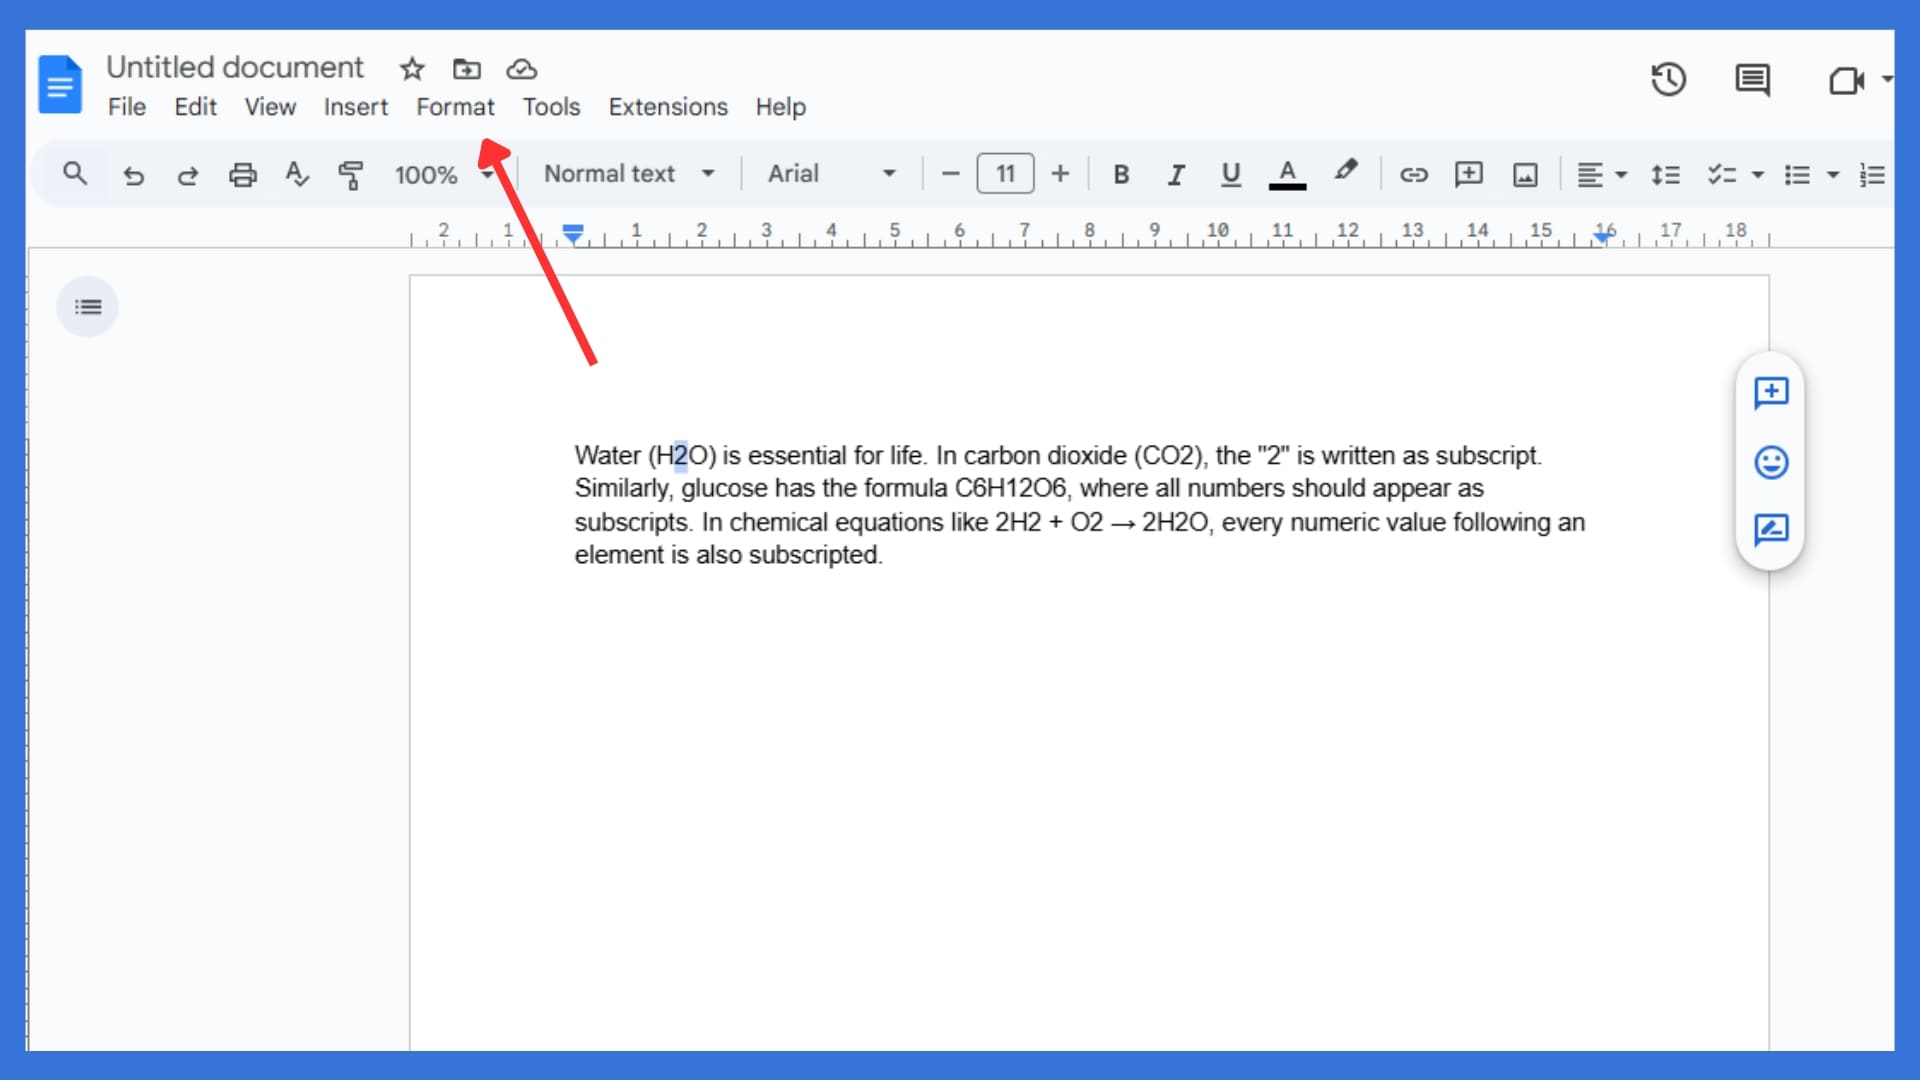
    Step 3: Click on the “Format” Menu:

    Click on the “Format” Menu

    Then, go to the top toolbar and click the format option to show additional formatting options instantly.

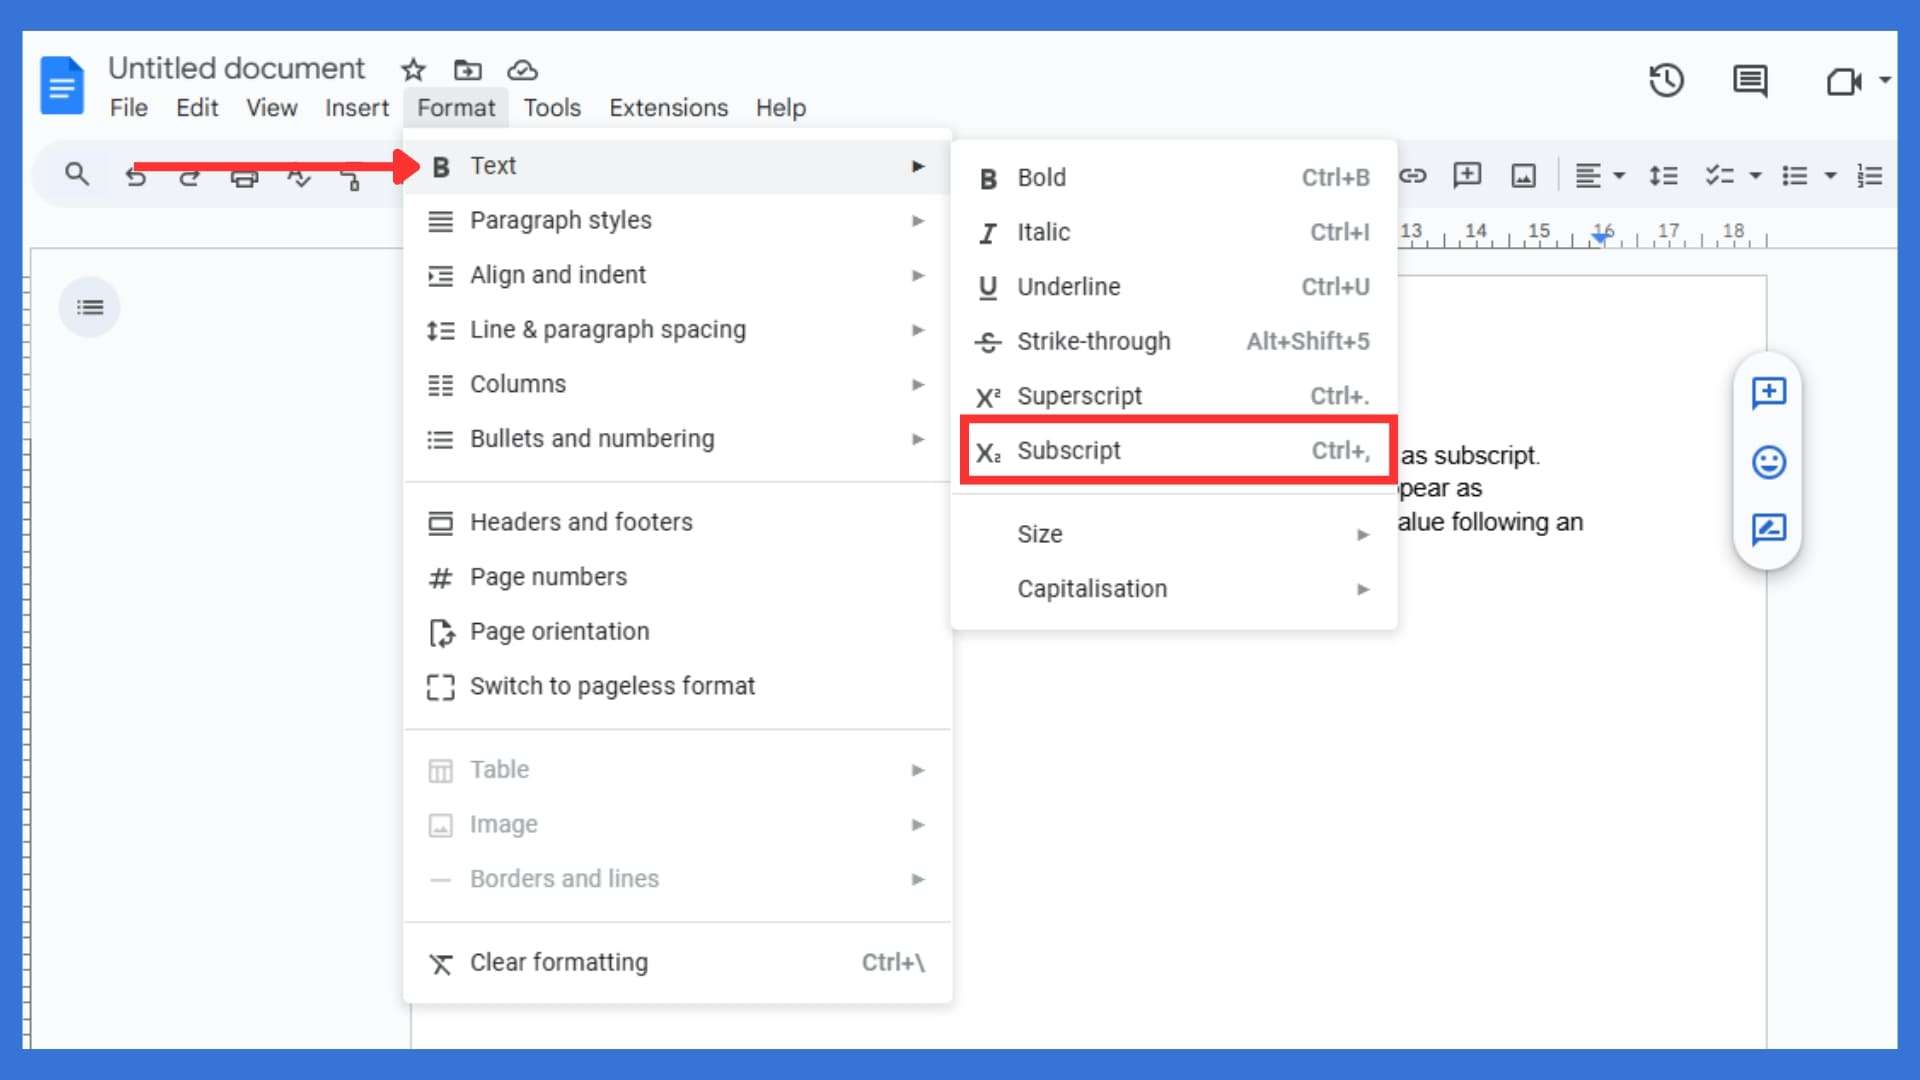
    Step 4: Go to “text”> “Subscript”:

    Go to “text”>“Subscript”

    Finally, choose Text, then click Subscript to apply subscript formatting to your selected text immediately.

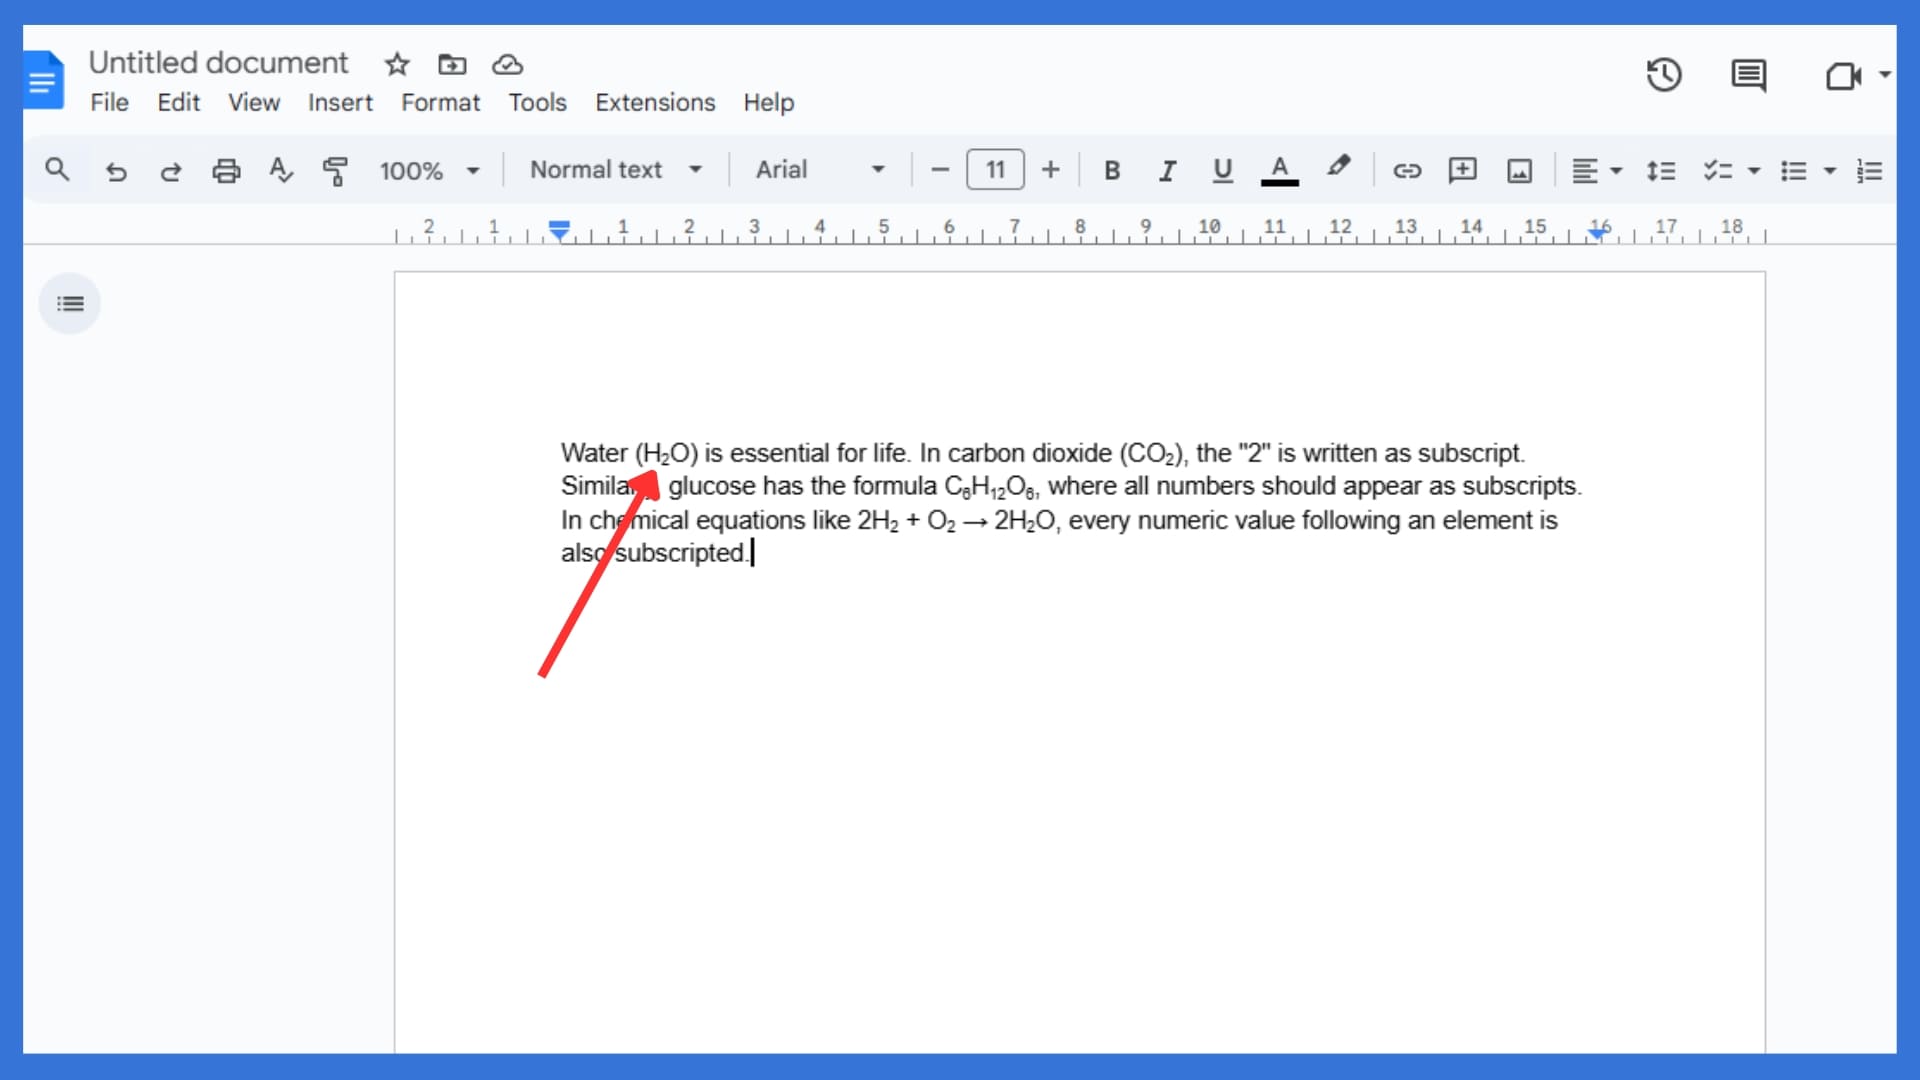
    Step 5: Your Text Is Now Smaller:

    Your Text Is Now Smaller

    Now your selected text appears smaller and aligned with the bottom of the rest of your text. 

    Additional Ways To Subscript In Google Docs

    Besides the format menu, there are other simple methods for how to do subscript in Google Docs efficiently. You can use a keyboard shortcut—Ctrl +, on Windows or Cmd +, on Mac—to apply subscript quickly. This shortcut helps when editing scientific data, chemical formulas, or any subscript text repeatedly. Additionally, users can use special characters by inserting Unicode symbols through the Insert > Special Characters panel. This feature becomes useful for mathematical equations or unique characters not available through basic formatting. Using Google Docs this way ensures flexibility in formatting for both desktop and mobile app versions.

    Conclusion

    Formatting errors can affect how your subscript text or superscript format appears in a Google Doc. Fortunately, whether you’re using a keyboard, format menu, or Google Docs app, formatting remains quick and simple. You can insert a superscript or apply a subscript for your equation, footnote, or chemical notation in seconds. Furthermore, using special characters is ideal for rare symbols or advanced use cases. This article explained every way on how to do subscript in google docs effectively across desktop and mobile app platforms. Have you tried using the keyboard shortcut, or do you prefer the formatting option in the menu?

    FAQs

    1. Can I subscript numbers and letters in Google Docs?
    Yes, you can apply subscript format to any selected numbers, letters, or symbols easily.

    2. Why is the subscript not working in Google Docs?
    Check if the selected text is properly highlighted and that you’re using the correct formatting option.

    3. How to switch between subscript and normal text?
    Click the subscript button again or press the same keyboard shortcut to toggle formatting off.

    4. Does Google Docs support superscript and subscript in tables?
    Yes, you can apply subscript or superscript formatting inside table cells without any limitations.

    5. Can I customize the subscript font size in Google Docs?
    No, subscript uses the default smaller size, but you can manually resize text after applying the subscript.

  • How Do I Know If My Phone Is Linked To Another Device

    How Do I Know If My Phone Is Linked To Another Device

    how do i know if my phone is linked to another device

    Worried about digital intrusions and asking yourself, How do I know if my phone is linked to another device? You’re not the only one. Many Android and iPhone users unknowingly expose their phones to unauthorized devices through synced apps, Google accounts, Apple IDs, or insecure connections. This often puts personal information, passwords, and sensitive data at serious risk. Malicious apps and spyware may silently operate in the background, accessing your device remotely.

    Thankfully, you can identify and disconnect unwanted devices by using your phone’s built-in tools. This guide answers how do I know if my phone is linked to another device and shows you how to fix it with practical steps.

    Signs Your Phone May Be Connected to Another Device

    Unusual Data Usage:

    Sudden spikes in data usage may indicate your smartphone is synced to another device without permission. Moreover, a linked device might access apps or services, causing abnormal background consumption. Hence, regularly check your data usage in the settings app to detect unauthorized devices using your connection across all your devices.

    Increased Data Usage From Specific Apps:

    Certain apps using excessive data could be a sign of malicious software or spyware. Also, hackers may use these apps to access your personal information through an unauthorized phone connection. Thus, identify apps with suspicious activity and remove any app or service not previously installed by you.

    Battery Drain:

    Battery draining faster than usual may be connected to background activity from devices synced to your iPhone or Android. Additionally, malware or unauthorized linkages often run silently, consuming energy continuously. Therefore, review your battery settings to locate apps or devices linked without your permission that might be affecting your battery.

    Slow Performance:

    A phone linked to another device may experience unexpected lag or system freezing during regular use. Chiefly, unauthorized access or malware infections running in the background slow down your smartphone’s response time. Consequently, check for unverified apps, review app permissions, and secure your device from unknown connected devices.

    Unfamiliar Apps or Settings:

    You may notice unfamiliar device settings or apps that you never installed on your Android or iOS device. Likewise, this may indicate your phone is linked to another device and is being remotely manipulated. So, always review and adjust the settings menu to ensure no unknown app or configuration exists.

    Strange Phone Behavior:

    Random shutdowns, strange noises during calls, or altered settings could be a sign of unauthorized access. Besides, such behavior might result from malware or spyware synced via a Bluetooth or Wi-Fi connection. Subsequently, inspect your list of devices to find any device connected to your phone without your knowledge.

    Unauthorized Access:

    Access logs in your Google account or Apple ID might reveal unauthorized device activity. Therefore, check for any active sessions or devices that you never approved. Lastly, enable two-factor authentication, and if needed, select remove from account for any unrecognized or suspicious device entries.

    Suspicious Notifications:

    Receiving verification codes or sign-in alerts not triggered by you may be a red flag. Notably, these might come from devices using your account credentials without your permission. Thereupon, inspect your account settings straightaway, as such notifications may indicate ongoing attempts to breach your phone’s security and privacy.

    What to Do If Your Phone Is Linked to Another Device

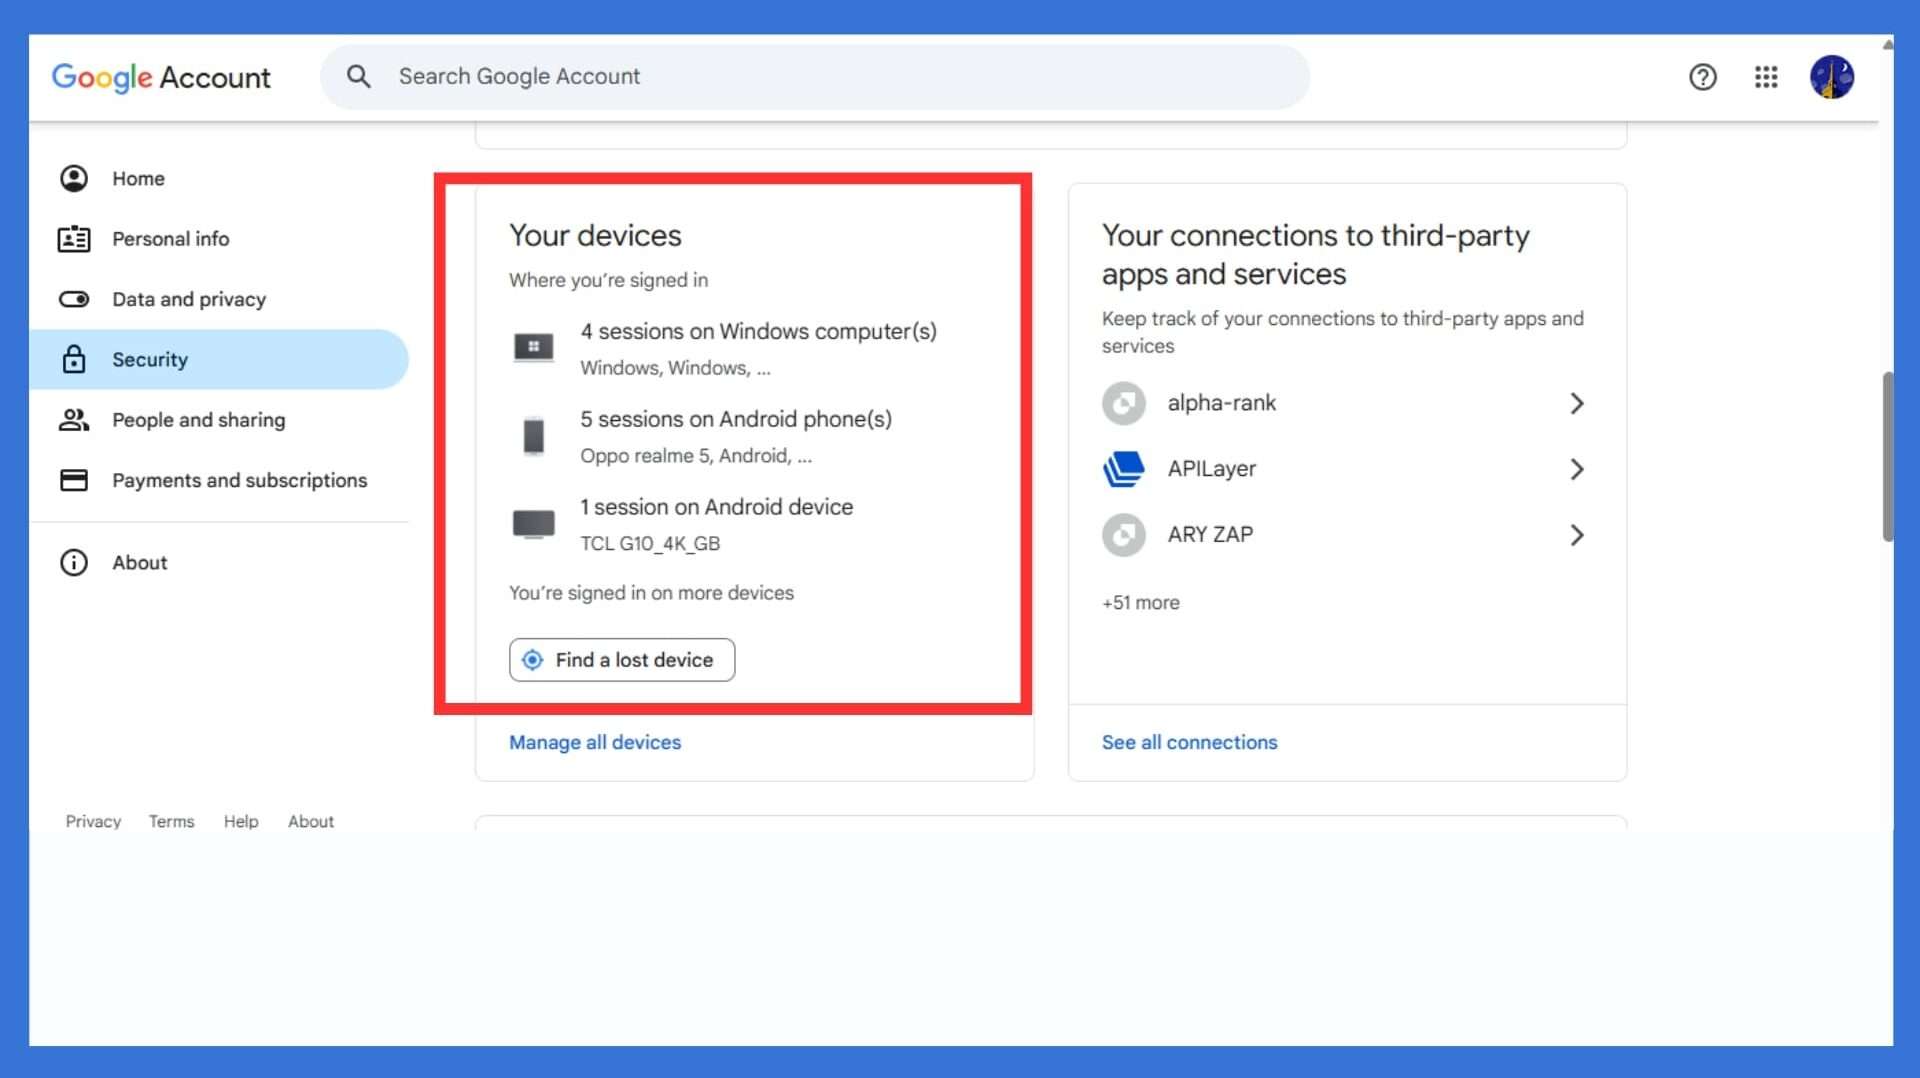
    1. Access Google Account Settings:

    Access Google Account Settings

    How do I know if my phone is linked to another device via Google? To check if your phone is linked to another device, first access your Google account settings. Then, go to the Security section and look under Your Devices to see a list of devices. You’ll see devices connected to your account; find any unfamiliar device and select remove from account immediately.

    Additionally, review all active sessions and revoke access for any unauthorized device or unknown location. Further, enable two-factor authentication to block future unauthorized access attempts. This step helps secure your digital life and provides peace of mind across all your devices without delay.

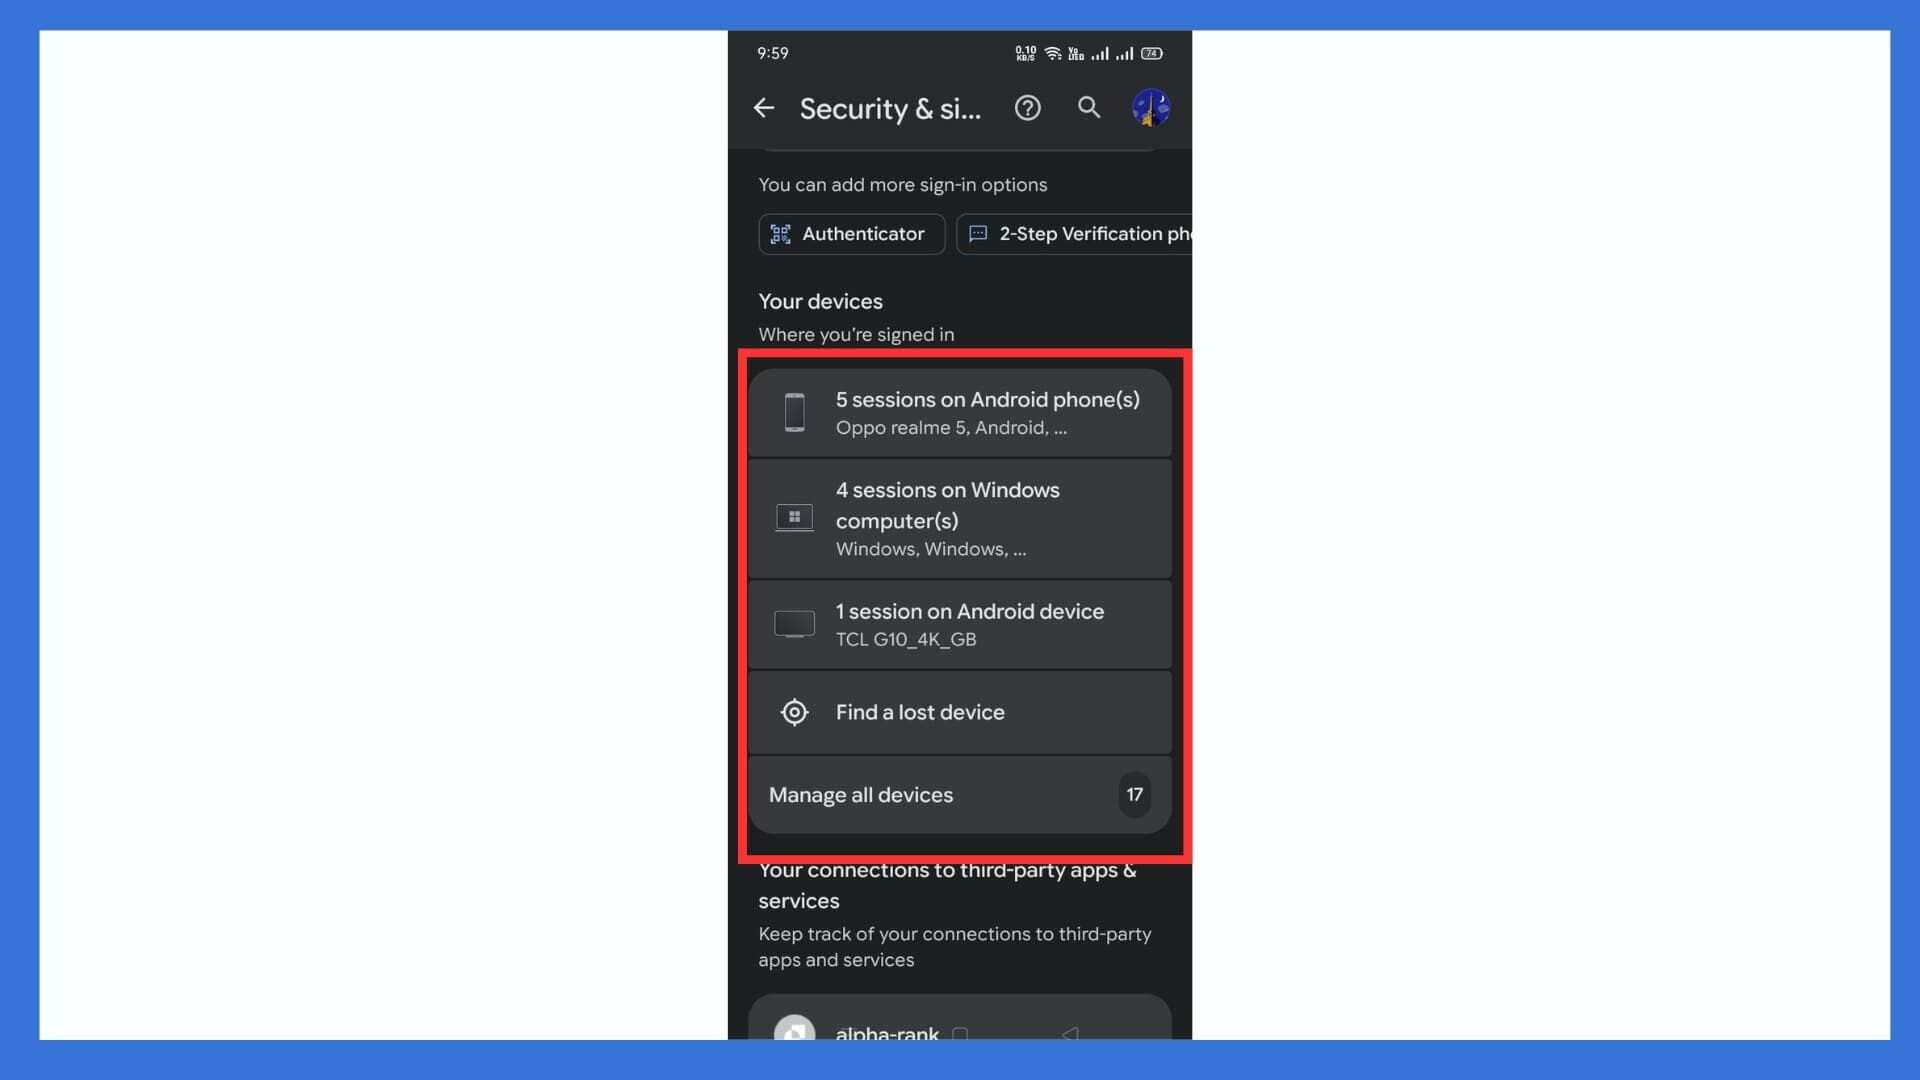
    2. Identify Authorized Devices on an Android Phone:

    Identify Authorized Devices on an Android Phone

    To check if your phone is linked to another device, go to the settings app on Android. Then, navigate to Google > Manage Your Google Account > Security > Your Devices. Here, you’ll see a list of devices connected to your Google account via your Android phone. Identify each device name and look for any entry that seems unusual or unauthorized.

    Afterward, tap the suspicious one and select remove straightaway to block remote access. Furthermore, update your password and monitor for abnormal behavior, especially unusual app activities or increased data usage.

    3. Check Apple ID and Linked Devices:

    iPhone users must access their Apple ID settings to see a list of devices synced. Go to Settings > Your Name > Scroll Down, and you’ll find all devices using your Apple ID. Look for any unauthorized devices or unfamiliar devices and remove them from the account. Additionally, check the iCloud account activity to make sure photos, documents, or data aren’t syncing elsewhere.

    Then, enable two-factor authentication to enhance your privacy and security further. Lastly, change your Apple ID password if any unknown device is found, to prevent future unauthorized access attempts.

    4. Utilizing Security Apps:

    Security apps like Bitdefender or Malwarebytes can help answer how do I know if my phone is linked to another device. Security apps help detect and remove threats from malicious software, spyware, or malware infections. Install reliable apps that actively monitor connected devices and flag any unauthorized activities in real-time. Moreover, these apps provide authentication features and alert you if your phone is linked to another device. Some even scan for malicious apps or services running in the background without your knowledge.

    However, always download apps from verified sources to avoid potential risks. Keep the app updated to safeguard against emerging security threats targeting Android devices and iOS systems alike.

    5. Checking Bluetooth Connections:

    Checking Bluetooth Connections

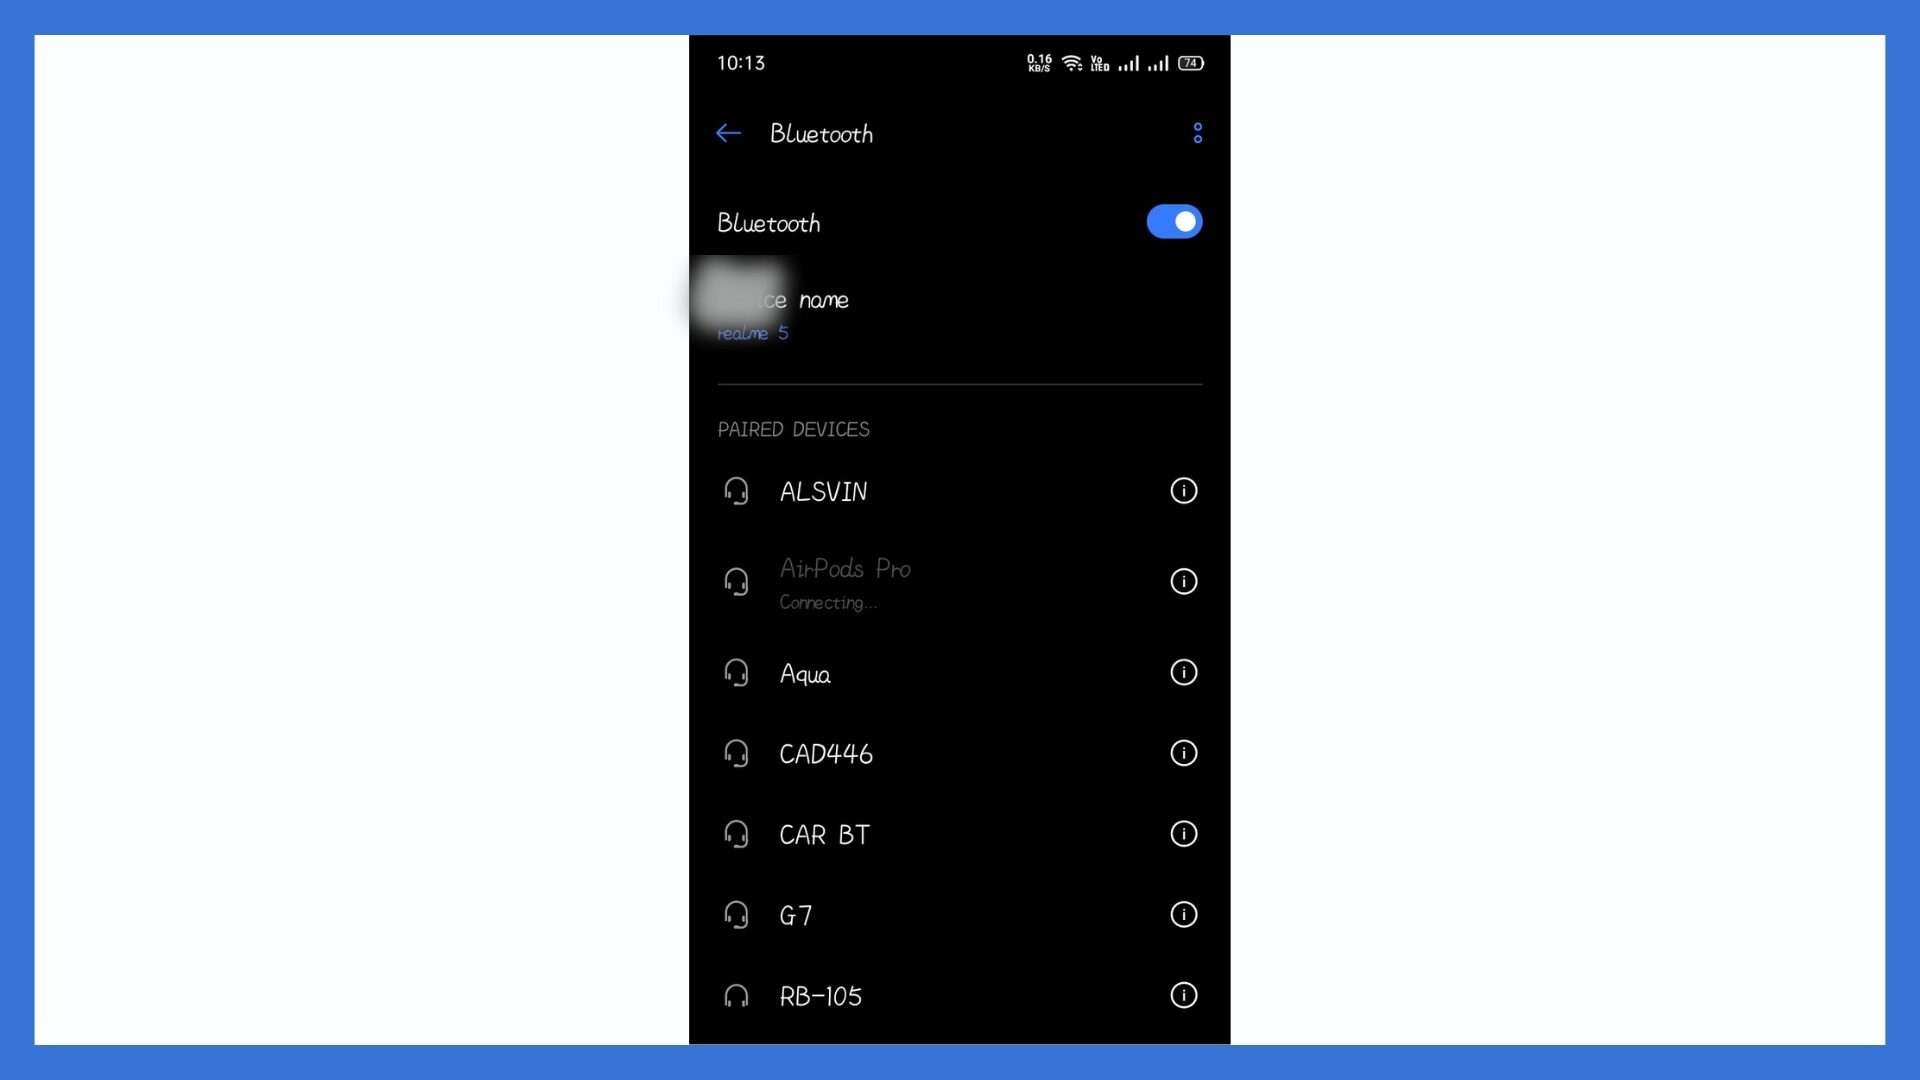
    Bluetooth connections may unknowingly expose your smartphone to unauthorized device pairings or hidden tracking tools. Go to Settings > Bluetooth, then view the list of devices currently or previously connected. Disconnect anything unfamiliar or suspicious that could access your personal information or location. Afterwards, turn off Bluetooth when not in use to reduce potential unauthorized linkages.

    Furthermore, avoid pairing with unknown Bluetooth devices, especially in public places or public Wi-Fi networks. Regular checks of this list ensure your phone’s operating system remains secure from background Bluetooth breaches or malicious pairing attempts.

    6. Monitoring Wi-Fi Connections:

    Monitoring Wi-Fi Connections

    Wi-Fi connections can expose your phone to unauthorized access through hidden synced or linked devices. Visit Settings > Wi-Fi to check connected networks and detect any devices connected through shared networks. Moreover, public Wi-Fi poses higher risks, especially if your device is not protected with strong passwords: Disable auto-connect features and clear saved networks no longer in use.

    Furthermore, use a VPN when browsing through public networks for additional security and privacy. If unknown access persists, reset network settings and create new, secure connections only with trusted devices thereafter.
    7. Monitor App Permissions:

    Monitor App Permissions

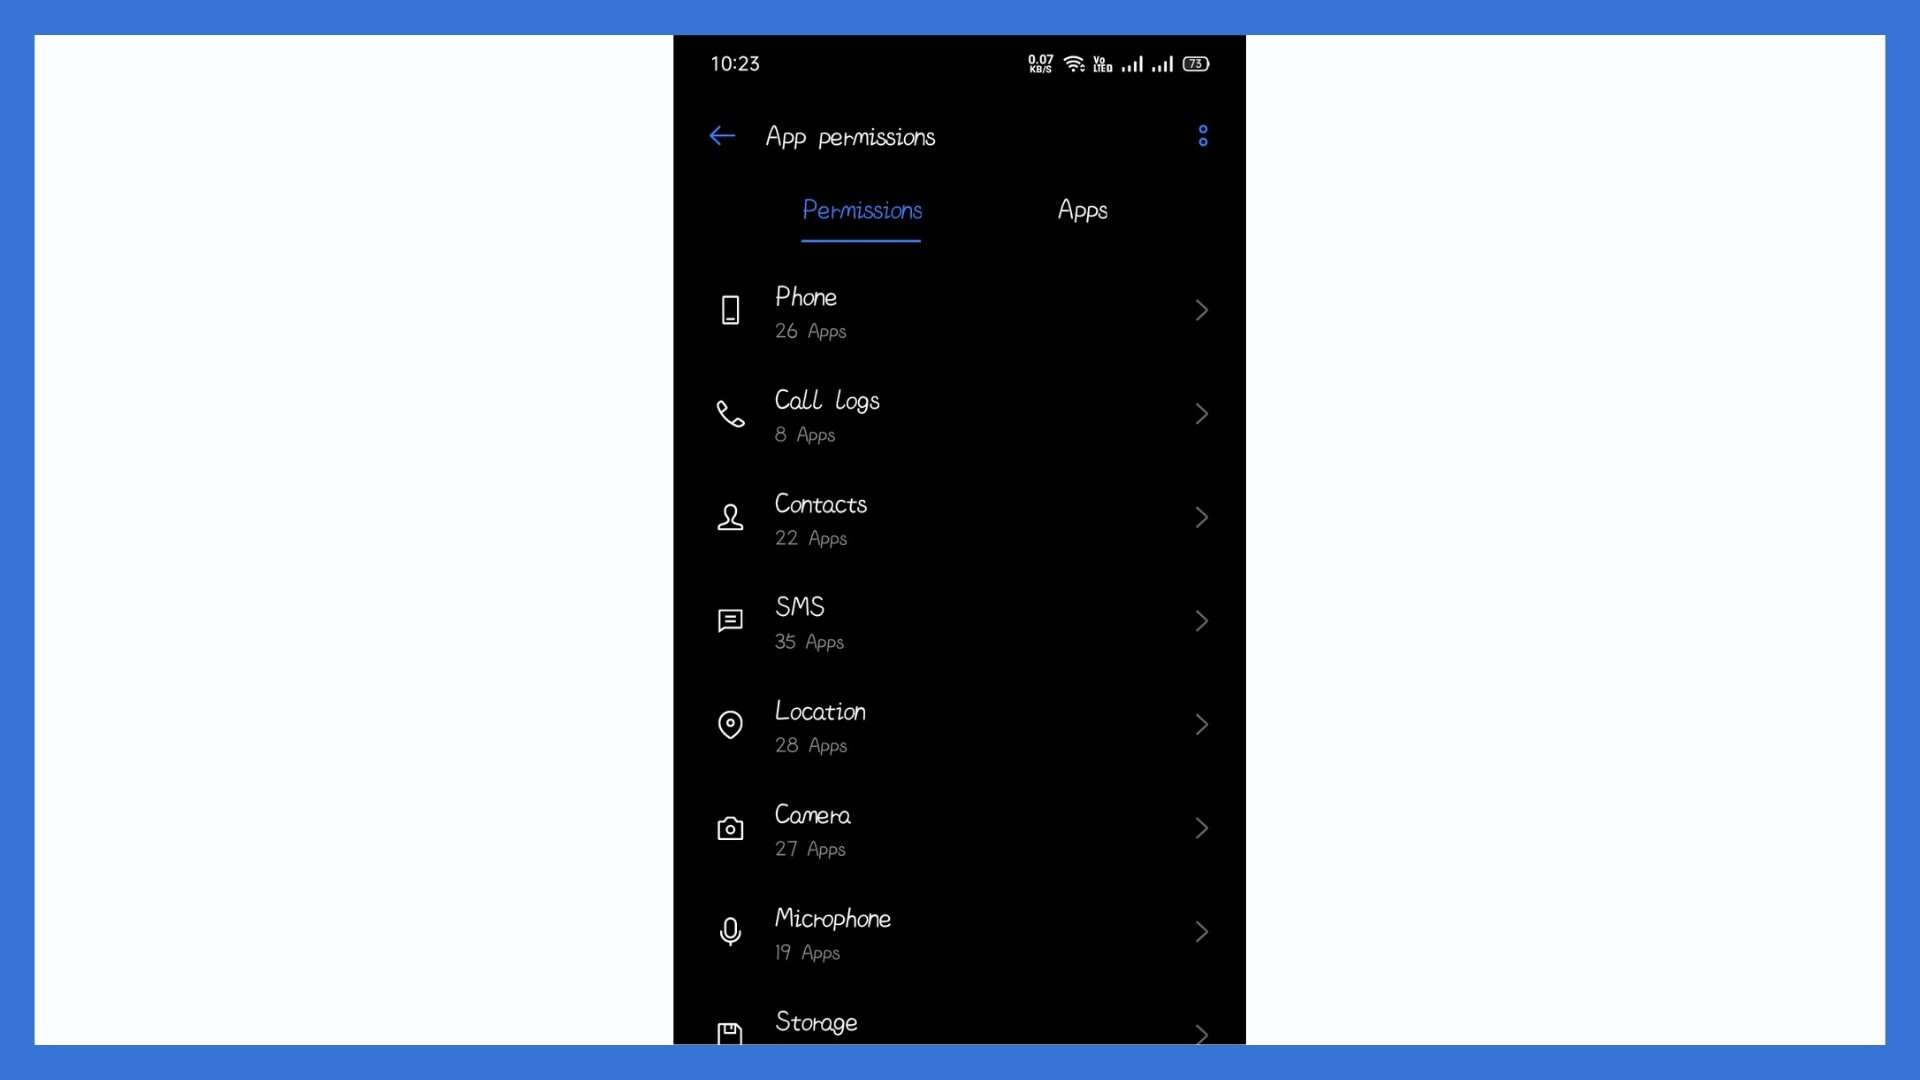
    Suspicious apps with excessive app permissions could indicate your phone is secretly connected to another device. Head to Settings > Apps > App Permissions to review access granted to each app or service. Look for apps accessing Bluetooth, camera, contacts, or personal information unnecessarily. Afterward, deny permissions that seem intrusive or unwarranted.

    Additionally, delete apps you don’t recognize or no longer use. This helps reduce exposure to malware or spyware that tries to operate silently. Lastly, regularly review permissions, particularly after new app installations or system updates that may reset permission settings.

    8. Reset Network Settings:

    If you suspect a linked device or unauthorized access, resetting your network settings is a quick preventive step. This removes all saved Wi-Fi networks, Bluetooth devices, and VPN configurations. Go to Settings > System > Reset Options > Reset Wi-Fi, Mobile & Bluetooth on Android. On iOS, find this under Settings > General > Transfer or Reset iPhone > Reset Network Settings.

    After resetting, reconnect only with trusted devices and use strong passwords on all Wi-Fi networks. This eliminates any unauthorized phone connections that may be accessing your data without your permission.

    Conclusion

    Now you know the signs, tools, and actions required to answer the question, How do I know if my phone is linked to another device? Regularly reviewing your connected devices, checking your Google or Apple ID, and monitoring app permissions can reduce threats. Enabling two-factor authentication, using trusted apps only, and avoiding public Wi-Fi adds further protection. If you stay vigilant, you’ll maintain full control over your phone and safeguard your digital privacy. What steps will you take today to ensure your device isn’t silently linked to another without your knowledge?

    FAQs

    1. What does it mean if my phone is linked to another device?
    It means another device can access your account, data, or services synced through your phone.

    2. Can someone connect to my phone without my knowledge?
    Yes, if they have your credentials or access your device through spyware, Bluetooth, or unsecured networks.

    3. How do I check for connected devices on my phone?
    Go to your Google or Apple account settings and look for a list of connected devices.

    4. Why is my battery draining so fast suddenly?
    Unusual battery drain could be a sign of background activity from unauthorized or malicious apps.

    5. What apps can show if my phone is being monitored?
    Security apps like Norton, Bitdefender, or Malwarebytes can detect spyware and unauthorized tracking.

  • The Darkest Hour: What Made These Founders Keep Going

    The Darkest Hour: What Made These Founders Keep Going

    the darkest hour

    Every founder has a breaking point. It’s that silent moment, often unseen and unspoken, when they contemplate walking away from it all. Not because they’re weak, but because building something meaningful is hard. The entrepreneurial journey isn’t just about product-market fit or financial success; it’s about resilience, pain, uncertainty, and pushing forward when nothing makes sense.

    We often celebrate success stories, the funding rounds, the launches, the exits, but we rarely hear what happens in the quietest moments, when founders question everything. These are the moments that shape legacies. Below, eight founders share their darkest hours and what helped them keep going.

    When Legal Battles Threaten to Derail Everything:

    “He came after me legally, claiming ownership of my business… I seriously considered walking away from everything I had built.”

    Alan Katz, Presiding Officiant at Great Officiants, trusted the wrong contractor, and that trust turned into a brutal legal battle. The emotional toll, more than the legal one, nearly broke him. But his team, the gratitude of the couples they served, and even an acupuncturist helped him regain balance. This moment tested more than his ownership; it tested his identity. The resolution wasn’t just a legal victory; it was reclaiming his voice and commitment. That breaking point, he now says, made him a better, stronger leader, one built to last.

    When Industry Dysfunction Becomes the Catalyst for Reinvention:

    “I almost walked away when I realized the real pain in moving wasn’t the boxes — it was the broken system behind them.”

    Bretton Auerbach, CEO of Local Movers, was overwhelmed by an industry riddled with distrust and chaos. But that breaking point became a pivot. Rather than compete as another moving company, he reimagined the business as a free concierge service that vets movers and manages logistics. That shift changed everything. “Burnout became clarity,” he says. His motivation? “An industry too flawed to leave and too important to ignore.” That purpose now fuels a mission built on trust.

    Letting Go of Control Was the First Step Toward Real Growth:

    “I realized the biggest barrier to growth was my own need to control everything.”

    Leury Pichardo, Manager at Digital Ceuticals, shared a transformative lesson learned from his early ventures. In his first automotive content site, Leury played every role—writer, editor, SEO—believing hands-on intensity guaranteed success. But one week off proved otherwise. The business stopped entirely, and he saw the truth: he hadn’t built a company, just a high-stress job. That realization shifted his mindset. He became an architect, not a laborer—systematizing every task, creating SOPs, and empowering others. That’s what made the business scalable, sustainable, and eventually sellable.

    When Financial Desperation Sparks a Tug-of-War Within:

    “One part of me wanted to quit… The other said I’d come too far to stop now.”

    Lisa Martinez started TX Cash Home Buyers with no real estate background, just hunger to learn. But as deals dried up and income vanished, she quietly took a part-time job to stay afloat. It felt like failure. The real battle, though, wasn’t in the finances, it was in her mind. Was this worth it? Should she quit? But something inside reminded her: you only fail if you stop. Today, she’s still here, wiser and stronger. That moment, of internal tug-of-war, proved she had what it takes to stay in the game.

    When Losing Your Job Sparks the Start of a Legacy:

    “I’d just been let go… no warning, no plan B. Then I got offered a role on the Tomb Raider movie — it gave me the funds to start Webheads.”

    JM Littman, founder of Webheads, didn’t dream of entrepreneurship; he was pushed into it. Being fired forced him to think differently. The gig that followed, unexpectedly, was his launchpad. With the money earned, he founded Webheads, a digital agency that has lasted over three decades. It wasn’t confidence that kept him going; it was fear of going back and the exhilaration of building on his terms. From uncertain beginnings came solid foundations, proof that some of the strongest legacies start in the rubble of rejection.

    When Helping One Person Redefines the Entire Mission:

    “I almost walked away from it all until a woman from out of state called sobbing. Her late father’s Tucson home was rotting, full of junk, and yes, a dead rat in the wall.”

    Max Casey, CEO of Unbiased Options Real Estate, was facing the kind of disillusionment that slowly drains purpose. But that desperate phone call changed everything. With no agents willing to help, his team stepped in, managing cleanout, repairs, and ultimately the sale. That one act rekindled his belief in why the work mattered. “This work is about more than property. It’s about showing up when no one else will,” he explains. In states like Arizona, where aging populations are leaving behind homes filled with emotional and logistical baggage, the mission became crystal clear. Casey stayed away from closing too many deals, but brought dignity and closure to families who had nowhere else to turn.

    When Grief and Loneliness Threaten the Will to Lead:

    “My stepson Hamish died… I took the CEO role and never felt lonelier or more desolate in my life.”

    Katherine King wasn’t supposed to be CEO of Dazychain. But tragedy forced a change. Her husband stepped down to grieve, and she stepped up, while dealing with unimaginable loss. The burden of running a company, keeping a team afloat, and navigating deep personal grief nearly broke her. But each small step forward was a triumph. She chose to continue not because she had to, but because she believed in the future. Now, with clarity and gratitude, she leads with greater empathy, proof that even in loss, purpose can rise.

    When Rock Bottom Becomes Day One Again:

    “Starting over is never easy. But we began again with a small $5 project… it was about choosing to move forward.”

    When Andranik Minasyan, CEO of inoRain, shut down his ISP business, he wasn’t sure he’d build again. But with a team of people who believed in him, he decided to take the first step, no matter how small. That step was a $5 freelance job. It wasn’t glamorous, but it reignited momentum. From that moment, they grew inoRain into something bigger. The lesson? Big wins don’t start with fireworks. They start with saying yes, to a small project, to a new chapter, to trying again with better clarity and people who won’t let you fall.

    Conclusion: 

    The thread connecting each of these stories isn’t just survival, it’s significance. These founders didn’t push through because of a sudden breakthrough or external validation. They pushed through because something in them, or around them, reminded them that what they were building mattered. Whether it was a DM from a stranger, a wall of thank-you notes, or the unwavering support of a team, these moments didn’t just save their startups, they redefined their purpose. In the end, grit is quieter than we think. And often, it’s made of a single decision: Don’t stop.

  • Why Is My Phone Not Charging? Here’s What You Can Do

    Why Is My Phone Not Charging? Here’s What You Can Do

    why is my phone not charging

    You connect the charger, yet nothing happens, and you’re left wondering, Why is my phone not charging? This issue affects millions, with causes ranging from a faulty cable to lint in the USB-C port. Reports show that devices like the iPhone 15 and Samsung models often face fast charging and port problems. Rather than panicking, try using another device with your charger or cleaning your phone’s charging port.

    This article offers proven methods to fix charging issues, boost battery health, and restore proper charging. Keep reading to get the complete guide on how to troubleshoot and charge your device effectively.

    Common Reasons Your Phone Has Stopped Charging

    1. Incompatible or Faulty Charger and Cable:

    Incompatible or Faulty Charger and Cable

    A faulty charging cable or an incompatible charger may cause your phone to stop charging properly. Occasionally, a USB-C cable may appear fine but hold hidden damage that disrupts consistent power delivery. Additionally, using a charger not certified for your Samsung or iPhone 15 may affect device charging stability.

    Try a different cable or charger, especially if your phone is connected to a charger but won’t charge. Besides that, charging issues often arise when generic cables can’t hold a charge effectively. Furthermore, certified mobile accessories ensure your phone charges safely and efficiently. Hence, always check your charging setup before assuming internal damage.

    2. Issues With the Power Source or Adapter:

    Issues With the Power Source or Adapter

    Your phone may not charge due to a faulty adapter, damaged plug, or unstable power outlet. Consequently, try charging your device using a different outlet or switch to another power source. Sometimes, the root cause lies not in the cable but in the adapter’s internal components. Likewise, a power outlet that works intermittently may interrupt fast charging and cause glitches.

    Before assuming your cable or phone is damaged, test another device with the same adapter. Comparatively, stable wall outlets charge better than loose extension cords. Therefore, identifying the issue early can prevent permanent damage to your phone’s battery or port.

    3. Physical Damage to the Charging Port:

    Physical Damage to the Charging Port

    A damaged charging port can also prevent your phone from connecting to a charger or charging properly. Signs of damage may include a loose USB connector, a burnt smell, or difficulty inserting the cable. Also, physical damage often affects Samsung phones after sudden drops or improper cable yanking. Before you blame a faulty cable, closely inspect the charging port for cracks or bent pins. 

    Furthermore, prolonged use under pressure may damage the phone’s charging port or even its motherboard. Eventually, charging issues worsen if internal components fail to align with the charging cable. Hence, seek professional help if damage is evident.

    4. Debris or Dust Buildup in the Charging Port:

    Debris or Dust Buildup in the Charging Port

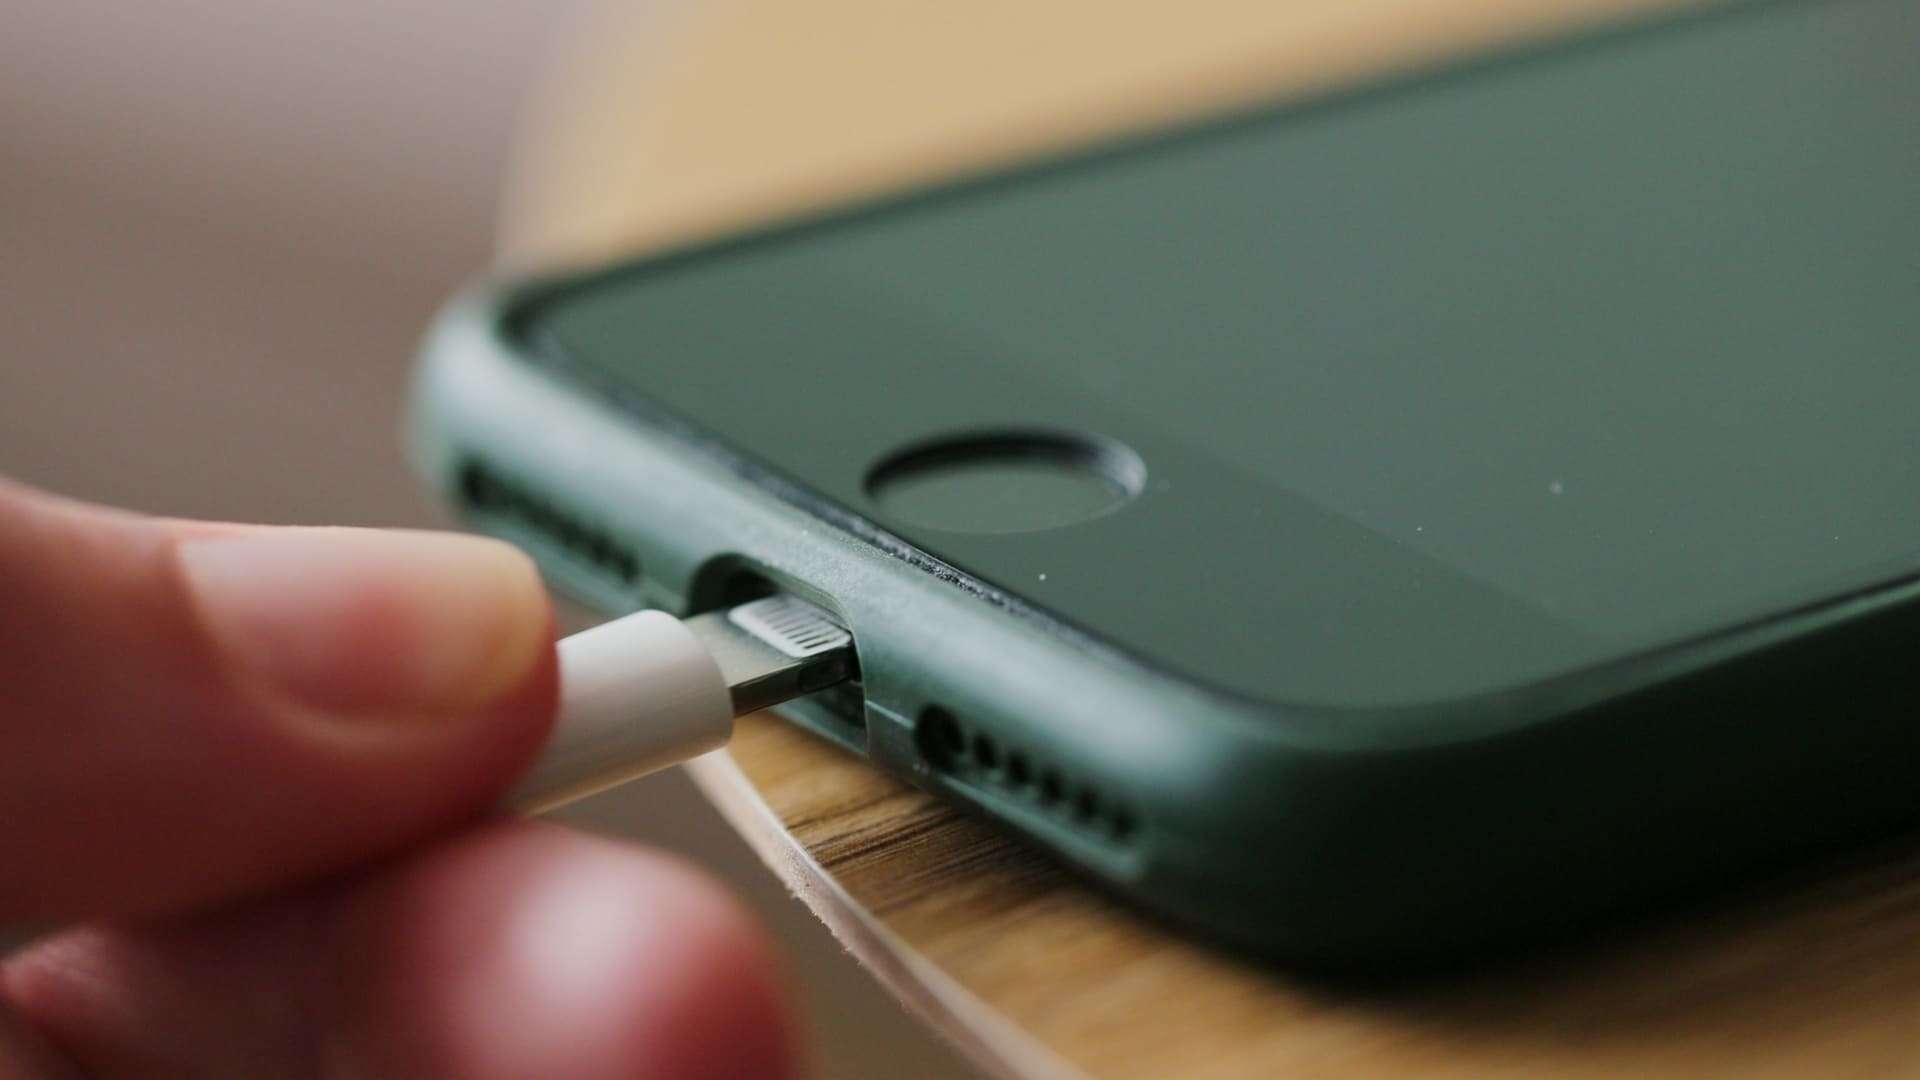
    Lint, dust, or grime inside the port may cause your phone to stop charging or charge intermittently. Especially when you rely on your device for long hours, debris buildup often goes unnoticed. Try using a toothpick or compressed air to clean your USB port carefully. However, avoid using metal objects that may cause additional damage.

    Additionally, even a minor blockage can prevent the cable from connecting securely with the port. Debris from the charging port interferes with proper charging, particularly on USB-C models. Thus, clearing out the port regularly can restore fast charging and improve connector reliability. A blocked or dirty port is one of the top answers to why is my phone not charging.

    5. Software Glitches or System Bugs:

    Software Glitches or System Bugs

    Software glitches, background bugs, or outdated iOS 13 firmware may cause charging to stop unexpectedly. Sometimes, restarting your device or performing a force restart helps reset charging functions. Furthermore, a reboot fixes many minor issues, especially if your phone still won’t charge despite proper hardware. Also, charging may stop because the system misinterprets the battery’s actual state.

    Unlike hardware damage, glitches can be resolved without opening the device. However, persistent bugs may require firmware updates or factory resets. Moreover, phones like Google Pixel and newer iPhones use charging optimization features that may temporarily limit power intake during charging cycles.

    6. Battery Health and Charging Limits (e.g., Charging at 80%):

    Battery Health and Charging Limits (e.g., Charging at 80%)

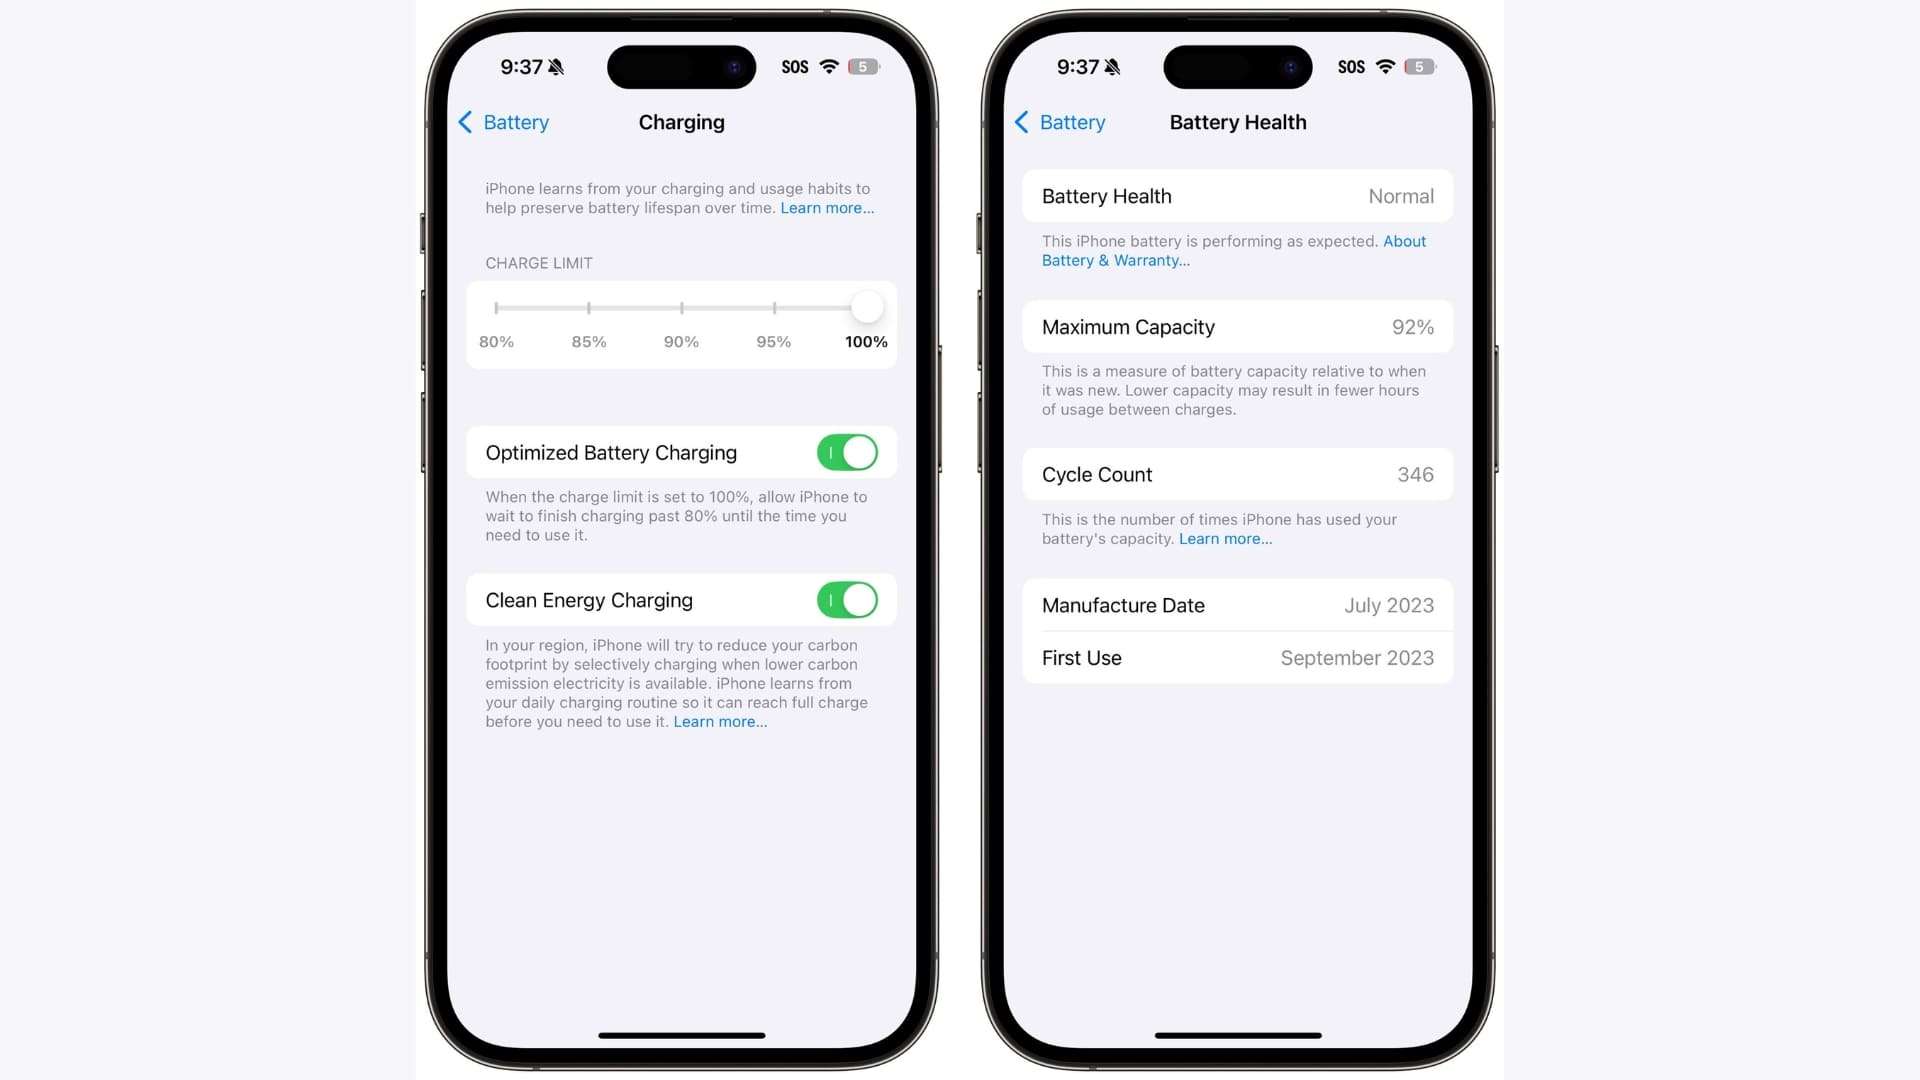
    Charging limits such as “Charging at 80%” are now common, especially on iPhones with optimized battery charging enabled. This feature aims to extend the battery’s lifespan by slowing charging after reaching 80%. Moreover, degraded battery health may cause your phone to stop charging altogether. When the battery can no longer hold a charge effectively, replacing it becomes necessary.

    Also, extended periods of overheating may trigger safety stops that pause charging. iPhones and Samsung devices alike rely on internal sensors to manage these scenarios. Consequently, if your phone stops charging consistently at 80%, review your battery health settings immediately.

    When You Should Seek Professional Help

    Sometimes, charging issues go beyond simple fixes and require expert evaluation or component replacement. You should seek professional help in the following situations:

    • Your phone still won’t charge after trying a different cable, adapter, and power source.
    • The charging port shows noticeable damage, or your USB connector feels loose or wobbly.
    • You notice physical damage near the USB-C port or signs of damage on the motherboard.
    • The charging port could be faulty due to extended periods of grime, lint, or corrosion buildup.
    • Despite multiple reboots or force restarts, the phone is not charging or holds no charge.

    Moreover, if your device consistently fails to charge properly, professional repair is strongly advised. Don’t delay fixing it if you’re repeatedly asking yourself, Why is my phone not charging despite multiple attempts.

    Conclusion

    If you’re still asking Why is my phone not charging? The root cause might be surprisingly simple. Faulty cables, debris from the charging port, or a power outlet issue can all stop charging immediately. Restart your smartphone, try a different wall outlet, or clean the USB port using a toothpick. Additionally, check for software glitches or signs of damage that may affect charging at 80% or above. Persistent issues may need expert repair, especially if your connector or internal components are damaged. Have you ever faced the “why is my phone not charging” issue, and how did you fix it?

    FAQs

    1. Why is my phone not charging?
    Common reasons include a faulty cable, a blocked charging port, a software glitch, or an unstable power source.

    2. What should I check first if my phone won’t charge?
    Start by inspecting the cable, charging port, and power outlet for visible issues or debris.

    3. Can a dirty charging port stop my phone from charging?
    Yes, dust or lint can block the connection between your charger and the charging port.

    4. Does it matter which charger I use?
    Using a non-certified or incompatible charger may result in slow charging or charging failure.

    5. What are the signs that something is wrong with the charging port?
    If the cable feels loose or the phone charges only at certain angles, the port may be damaged.

  • How to Create a Desktop Shortcut for a Website: Quick Method

    How to Create a Desktop Shortcut for a Website: Quick Method

    how to create a desktop shortcut for a website

    Tired of typing the full URL every time you want to open your favorite website? Many users repeatedly visit the same sites but rarely take advantage of creating quick desktop shortcuts. If that sounds familiar, you’re not alone; this is a common habit among both casual and professional users. Learning how to create a desktop shortcut for a website saves time and makes frequent access much easier.

    Whether you’re using Chrome, Firefox, or Edge, the method is straightforward and requires only a few clicks. This article provides a comprehensive, step-by-step guide on creating a website shortcut directly on your desktop screen.

    Why You Might Want to Create a Desktop Shortcut for a Website

    Creating a desktop shortcut for a website enables you to quickly open your favorite site without needing to search. Instead of typing the full URL every time, you can access the site with one click. This method especially helps when using browsers like Chrome, Firefox, or Edge. Whether you want to create a desktop shortcut for a personal tool or a business app, the process is straightforward.

    Besides saving time, it improves accessibility for less tech-savvy users. Moreover, clicking an icon on your screen is faster than browsing through tabs or menus each time you want to open a site.

    Steps to Create a Desktop Shortcut for a Website

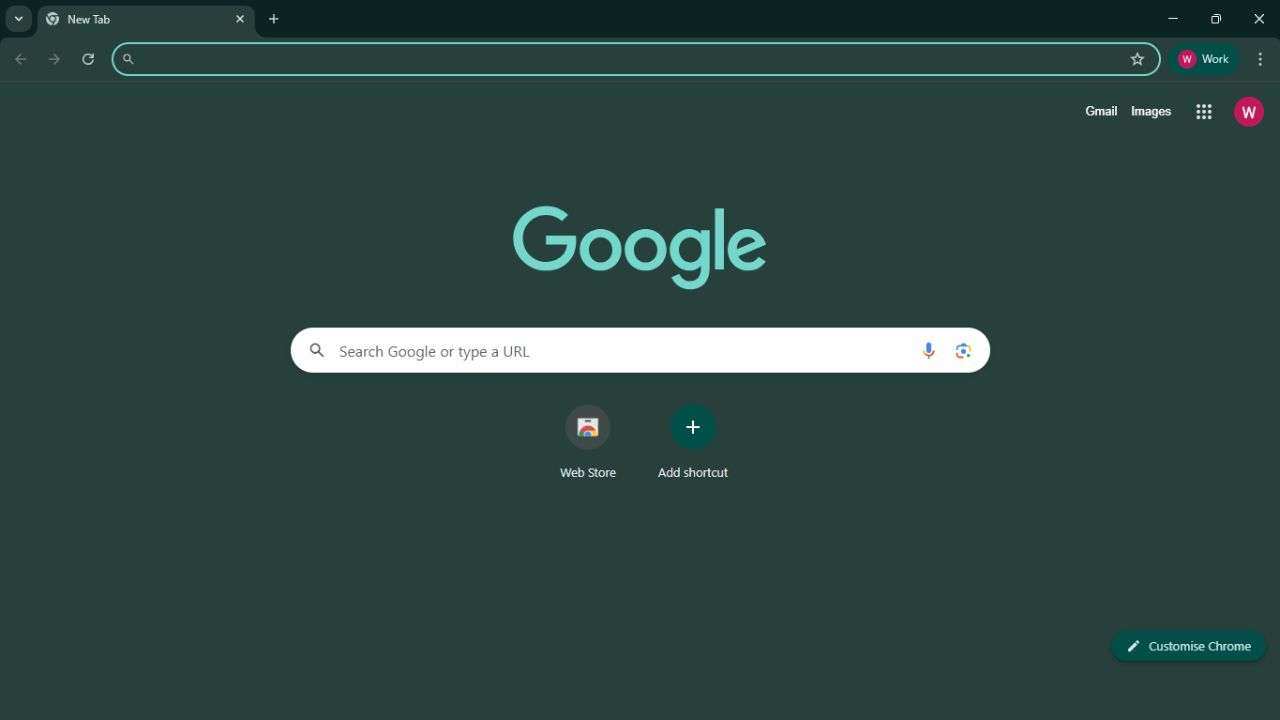
    Step 1: Open the Browser:

    Open the Browser

    Firstly, open your default web browser, such as Chrome, Firefox, or Microsoft Edge. Ensure your browser window is maximized to locate the site’s features and address bar easily. It’s better to use an updated version of the browser to avoid errors during shortcut creation.

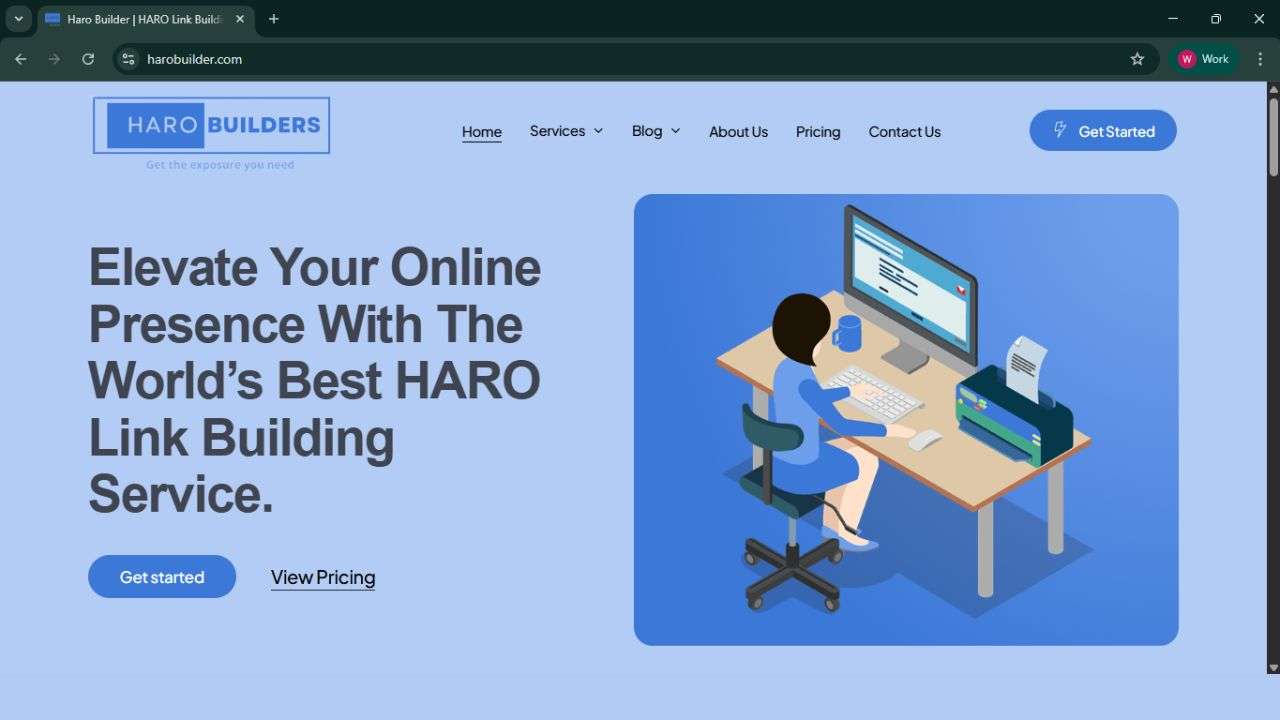
    Step 2: Access the Website:

    Access the Website

    Go to the website you want to create a shortcut for by typing its URL in the address bar. Ensure the site loads completely, so the browser can correctly fetch the title and shortcut icon. Then, check if this is the correct site you intend to add to your desktop for quick access.

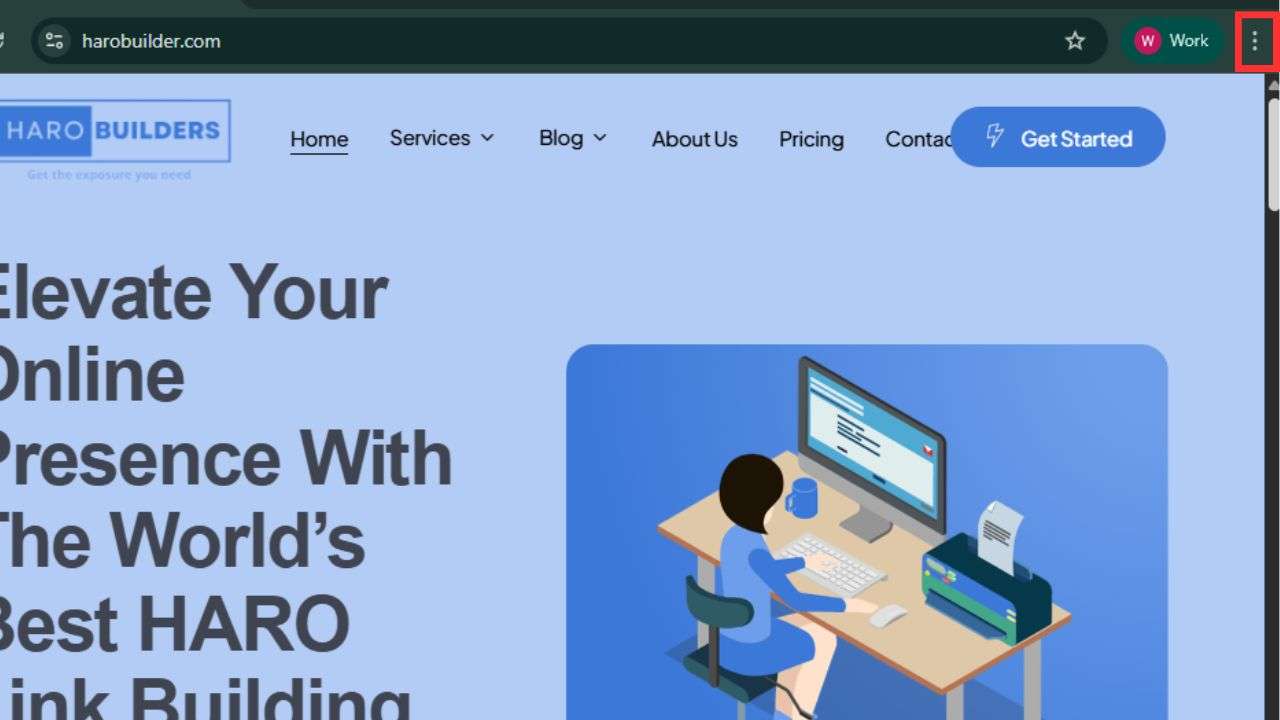
    Step 3: Click the Three-dot Icon:

    Click the Three-dot Icon

    In Chrome, click the three-dot menu icon located in the top-right corner of the browser window. This menu offers multiple options, including tools that allow you to create a desktop shortcut quickly. Firefox and Edge may not have this feature directly.

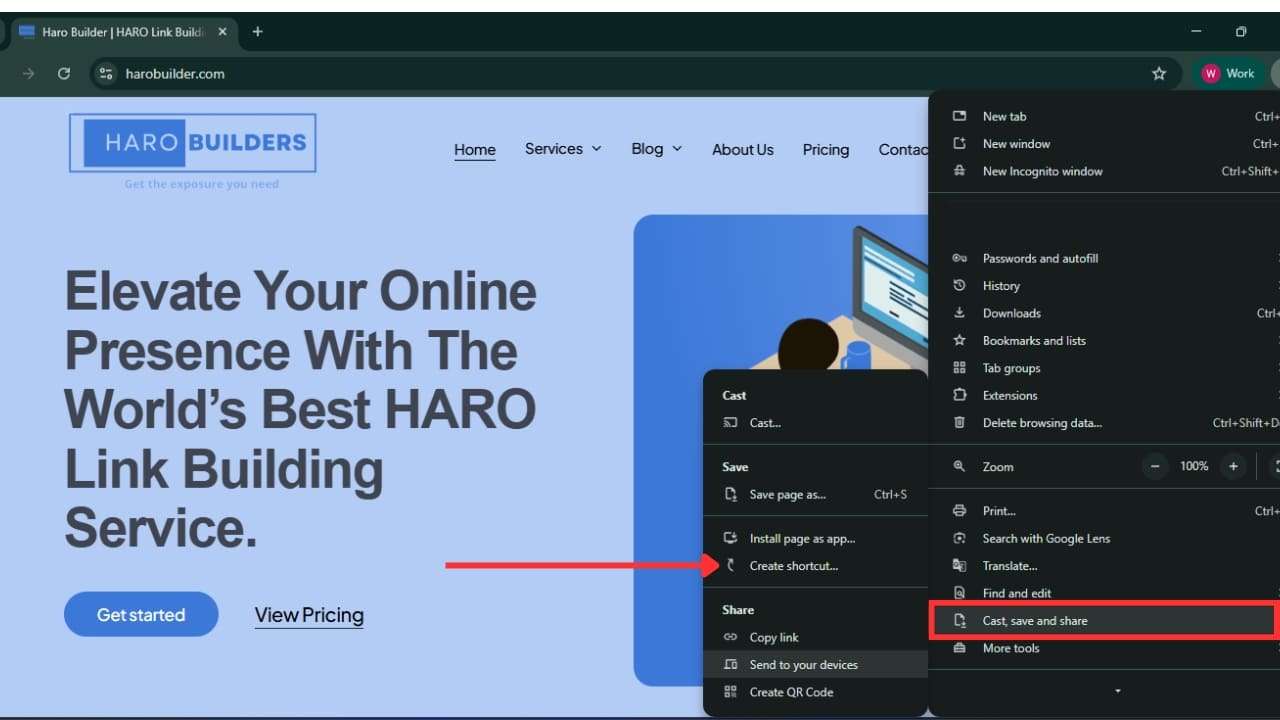
    Step 4: Go to “Create Shortcut”:

    Go to Create Shortcut

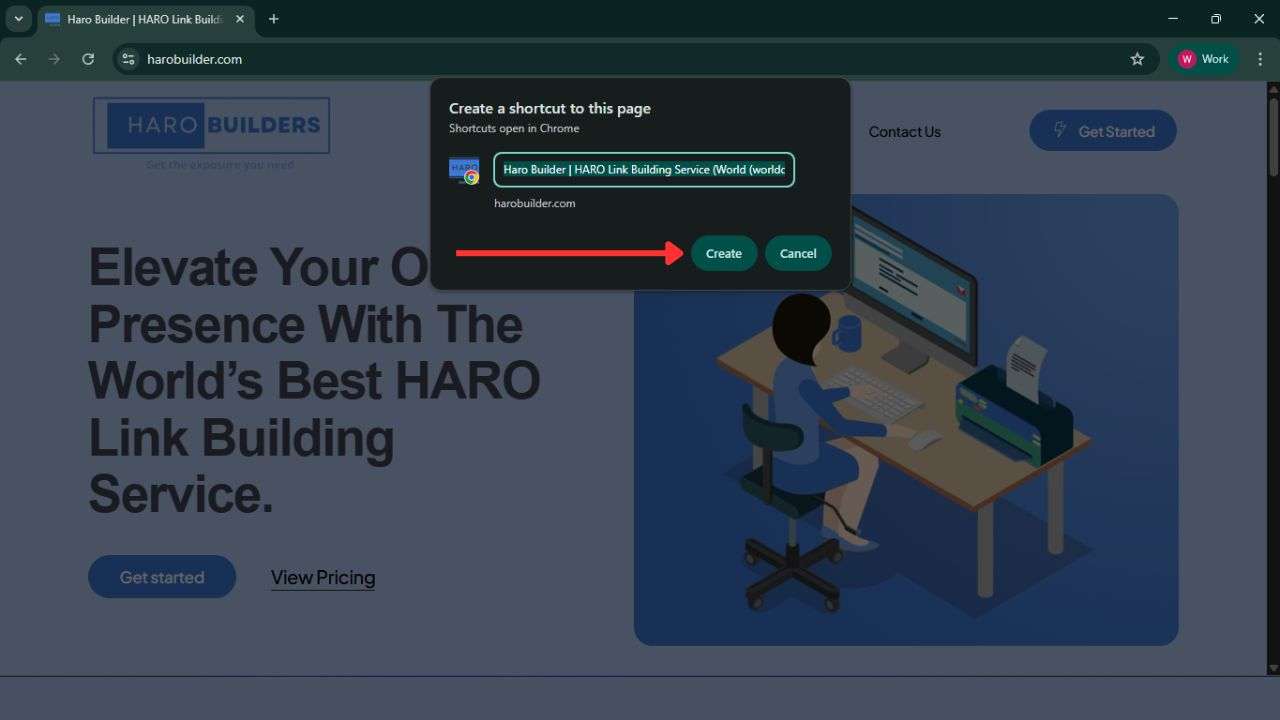
    From the menu, find and select the “Cast, save and share” option, then click “Create Shortcut” accordingly. A small box will appear on your screen asking you to give a name to the new website shortcut. 

    Step 5: Create the Shortcut:

    Create the Shortcut

    Give the shortcut a name and then click the “Create” button to complete the process and generate a desktop shortcut to the website. The shortcut icon now appears on your desktop screen and includes the site’s name and favicon by default. You can drag this shortcut to your taskbar or start menu if you want to access it more frequently.

    Step 6: Access the Shortcut:

    Access the Shortcut

    Double-clicking this shortcut will straightaway open the site in your chosen or default web browser. If you created it using Chrome, it may open in an app-like window without browser tabs and address bars. Eventually, this method allows you to quickly launch your favorite website directly from your computer desktop.

    Conclusion

    Once you learn how to create a desktop shortcut for a website, accessing your favorite pages becomes effortless. Double-clicking this shortcut instantly opens the site without requiring you to retype the address or use the browser menu. It helps you stay organized, save time, and reduce the daily effort spent reopening frequently used platforms. Whether on Windows or another OS, the process is easy and works across major web browsers. Now that you’ve read this quick guide, will you start creating desktop shortcuts for your most frequently used sites?

    FAQs

    1. Can I create multiple desktop shortcuts for different websites?

    Yes, you can create as many shortcuts as you like for different websites or web apps.

    2. Will the shortcut still work if I clear my browser history?

    Yes, clearing your history doesn’t affect the functionality of desktop shortcuts.

    3. Can I change the icon of the website shortcut?

    Yes, right-click the shortcut, go to “Properties,” then click “Change Icon” to update it.

    4. Do these shortcuts work on Mac computers, too?

    Yes, although the steps vary slightly on macOS, the feature works similarly using Safari or Chrome.

    5. Can I organize my website shortcuts into folders?

    Yes, you can create folders on your desktop and place the shortcuts inside for better organization.

  • What Is Website Tinting in Safari and How It Affects Web Design

    What Is Website Tinting in Safari and How It Affects Web Design

    what is website tinting

    Is your website’s top bar color suddenly blending with Safari’s interface on iPhone? That’s exactly what is website tinting. Many website owners notice inconsistent website looks due to this browser-specific feature introduced in iOS 15. Safari users now expect design elements like the address bar and tab bar to match the website theme. This tinting feature alters color schemes and impacts how web content appears on iPhone.

    However, with proper web design, you can use website tinting to create an immersive and user-friendly website. This article provides a complete guide on how tinting works, how to control it, and when to use it.

    What Is Website Tinting?

    What is website tinting? Website tinting is a visual feature introduced in Safari on iPhone with iOS 15. It changes the top portion of the Safari app, such as the address bar and status bar, to match the color scheme of the website being viewed. This tinting feature helps create a more immersive and user-friendly website experience by blending the website theme with the browser interface.

    When website tinting is enabled, it provides a seamless appearance, making the website appear as an extension of the Safari browser. Although it enhances visual harmony, web designers must adapt their designs accordingly for effective website tinting.

    How Website Tinting Impacts Web Design and Layouts

    Website tinting in Safari directly influences how the top portion of the browser visually blends with the website. When tinting is enabled, the color scheme of the website extends into the address bar and status bar, especially in the Safari app on iPhone running iOS 15. Consequently, this feature alters the perception of layout and spacing in Web Design.

    Web designers must thoroughly test their websites, particularly on Safari, to ensure the tinting feature enhances rather than disrupts the user experience. A poorly matched color scheme can diminish user experience or cause contrast issues. Meanwhile, a well-tinted website improves visual consistency and aligns the browser UI with the content.

    The tinting effects require designers to adapt their headers and backgrounds to suit this change. Likewise, implementing website tinting should follow clear design principles to avoid clashing themes.

    • It supports immersive design when the website theme aligns with the browser.
    • It can enhance user engagement by providing a seamless and user-friendly website appearance.

    How to Enable/Disable Website Tinting

    Website tinting is a visual option available in Safari on iOS 15 and later. This feature is enabled by default for most Safari users, but website owners and visitors can control it as needed.

    To enable or disable website tinting in Safari on iPhone, follow these steps:

    1. Open your Settings app:

    By default, the Settings app is located in the dock at the bottom of your screen and has a gray gear icon.

    Open your Settings app

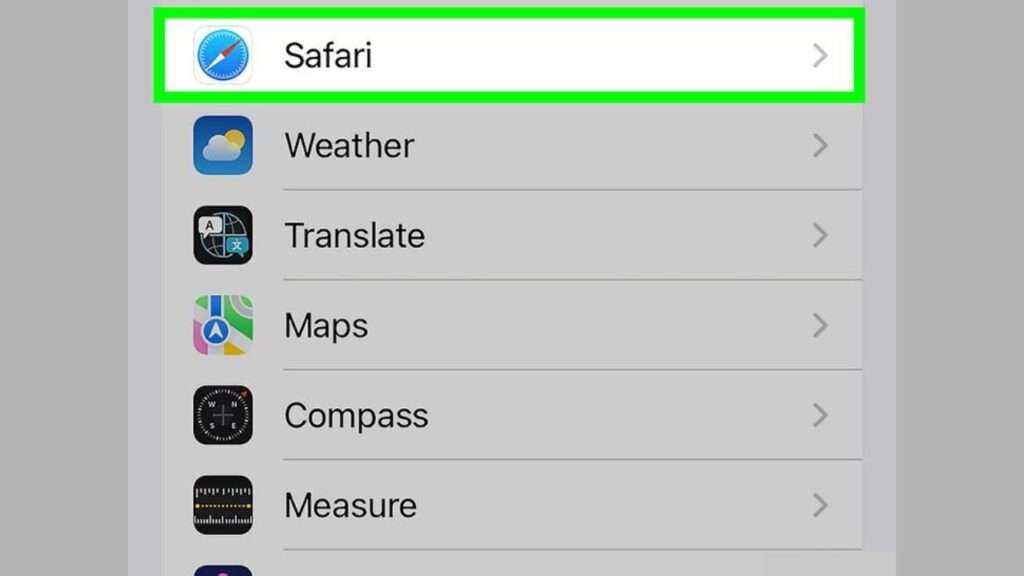
    2. Scroll down and tap on Safari:

    In the Settings menu, the Safari button is located in the same area as the other iOS apps, slightly lower down.

    Scroll down and tap on Safari

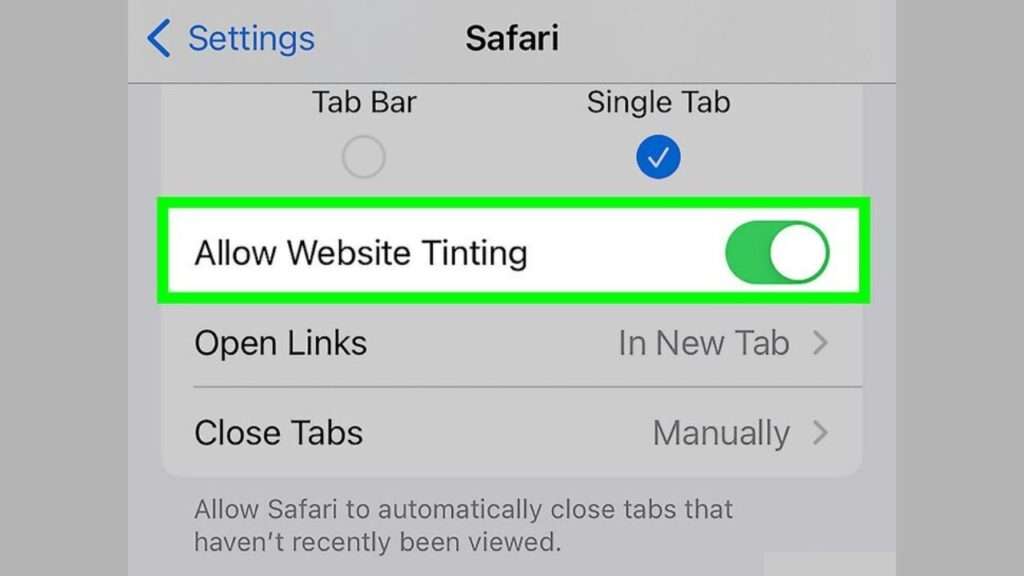
    3. Find the toggle for “Allow Website Tinting”:

    Under the “Tabs” header, tap the “Allow Website Tinting” toggle.  Website tinting is enabled when the toggle is green; it is disabled when it is gray.

    Find the toggle for “Allow Website Tinting”

    The Pros and Cons of Website Tinting

    Pros of Website Tinting in Safari:

    • Enhances User Experience: Website tinting provides a seamless browsing experience by matching the Safari browser’s theme to the website’s theme.
    • Improves Visual Consistency: The top portion of the Safari app, including the address bar and tab bar, blends seamlessly with the website’s color scheme.
    • Creates a More Immersive Layout: When tinting is enabled, users perceive a smoother transition between browser UI and website content.
    • Strengthens Brand Identity: A tinted website reflects brand colors more effectively, particularly when viewed on an iPhone with iOS 15.
    • Optimized for Mobile Browsing: Safari website tinting adapts seamlessly to the iPhone’s smaller browser interface, enhancing readability.
    • User-Controlled Feature: Users can enable or disable website tinting easily in the Safari settings app, offering flexible control.
    • Supports Web Design Personalization: Web designers can adapt the website tinting feature to create consistent visual effects across multiple pages.

    Cons of Website Tinting in Safari:

    • Not Compatible with All Browsers: Website tinting is a Safari-specific feature and does not work on all browsers or platforms.
    • Can Cause Visibility Issues: If the color scheme of the website is poorly chosen, it may reduce contrast on the status bar.
    • May Disrupt Layout Perception: Tinting effects can sometimes make users feel that the layout is broken, especially if the tinting is applied inconsistently.
    • Limited Support for Older Devices: Devices running iOS versions earlier than iOS 15 are not supported for displaying the website tinting feature.
    • Requires Extra Testing Time: Web developers must test the website with tinting enabled or disabled to ensure a consistent appearance.
    • Not Always Preferred by Users: Some Safari users may opt to disable tinting altogether, which can lead to an inconsistent user experience.
    • Could Misalign with Original Design: Tinting extends the background into the browser UI, which may not align well with all website content or themes.

    Conclusion

    Now that you understand what is website tinting, it’s clear how it shapes mobile browsing in Safari. It affects user experience, alters color schemes, and requires careful attention during web development. Although tinting offers several benefits, it also demands design precision to avoid mismatches or contrast issues. Whether you choose to enable or disable this feature, you must adapt your website accordingly for optimal results. Web designers and website owners should test their site when tinting is applied to ensure visual harmony. So, how has website tinting changed the way your website looks and functions in Safari?

    FAQs

    Is website tinting only available on iPhone?
    Yes, it’s primarily a Safari feature seen on iPhones running iOS 15 or newer.

    Do I need to redesign my site for website tinting?
    Not always, but testing your website with and without tinting helps maintain design consistency.

    Will website tinting affect my SEO?
    No, it’s a visual feature and doesn’t impact rankings or search engine indexing.

    What part of Safari does tinting affect?
    It affects the top portion, like the address bar and status bar, based on your website’s color.

    Can I preview tinting effects while designing a site?
    Yes, you can test it directly on an iPhone using Safari with tinting enabled.

  • How to Find All The Pages on a Website Easily

    How to Find All The Pages on a Website Easily

    how to find all the pages on a website

    Can’t seem to find all the pages on your website? You’re not alone; many website owners face this issue as well. During a website audit, missing pages, especially those that are hidden or orphaned, often go unnoticed. Failing to view all the pages on your site can result in reduced visibility in search results. Pages that Google has indexed or skipped might affect your site’s overall performance. 

    Thankfully, there are proven ways to find every single page using tools like Google Search Console, Google Analytics, or a website crawler. This article will help you learn how to find all website pages easily and efficiently.

    Why you may need to find all pages on a website

    Website owners often need to find all the pages on a website to maintain performance and visibility. Whether you’re planning a website redesign or conducting a website audit, identifying every single page is essential. It helps you view all active, hidden, and orphaned pages within your website structure.

    Orphaned pages are pages that have no internal links pointing to them, making them hard for search engines to crawl. Moreover, knowing how to find indexed pages that Google has already listed improves your ability to optimize them accordingly. Using tools like Google Search Console, Google Analytics, or a website crawler helps uncover pages that may not appear in regular search results.

    Additionally, when your goal is to improve SEO, finding the sitemap or viewing all URLs on a website ensures that a complete list of all pages is available, thereby preventing any important page from being overlooked during the optimization process.

    5 Ways how to find all the pages on a website

    1. Use Google search:

    Use Google search

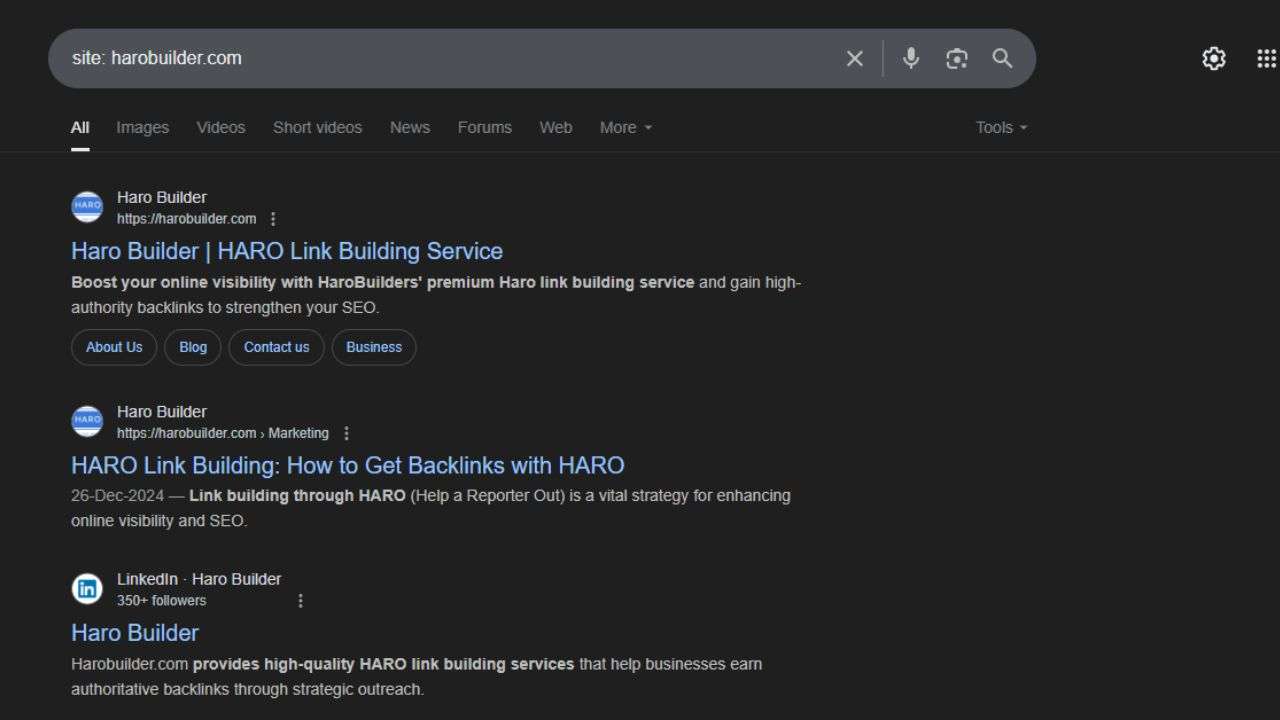
    Using Google Search is a great way to quickly and effectively find all the pages on a website. You can use advanced search operators, such as site:yourdomain.com, to view indexed pages that Google has already listed. This helps you compile a basic list of all the pages that Google has indexed and are appearing in search results. Furthermore, using filters such as keywords or file types can narrow the results to specific website pages.

    Additionally, this method helps uncover hidden pages or orphaned pages that aren’t linked from the homepage. While it’s not comprehensive, it provides valuable insights into the pages that Google sees on your website.

    2. Check the robots.txt file:

    The robots.txt file on the website can help you find or eliminate pages that are blocked from being crawled. Located at yourdomain.com/robots.txt, this file lists URLs or entire sections that are either allowed or disallowed for bots. Although it doesn’t display every page of your website, it gives important clues about what pages search engines are permitted to crawl.

    This step can also alert you to orphaned pages or hidden sections blocked from indexing. Additionally, reviewing this file is particularly important before any website redesign or SEO campaign to ensure proper visibility.

    3. Use a website crawler:

    Using a website crawler is one of the most accurate ways to find all the pages on your website. Tools like Screaming Frog or Sitebulb crawl your entire website URL structure and list every page it can reach. These tools identify broken links, orphaned pages, and pages that Google may not have indexed yet.

    Moreover, a website crawler allows you to extract metadata, header tags, and even the page title of every page. This method is essential during a website audit or when trying to display all the pages on a site.

    4. Use Google Search Console:

    Use Google Search Console

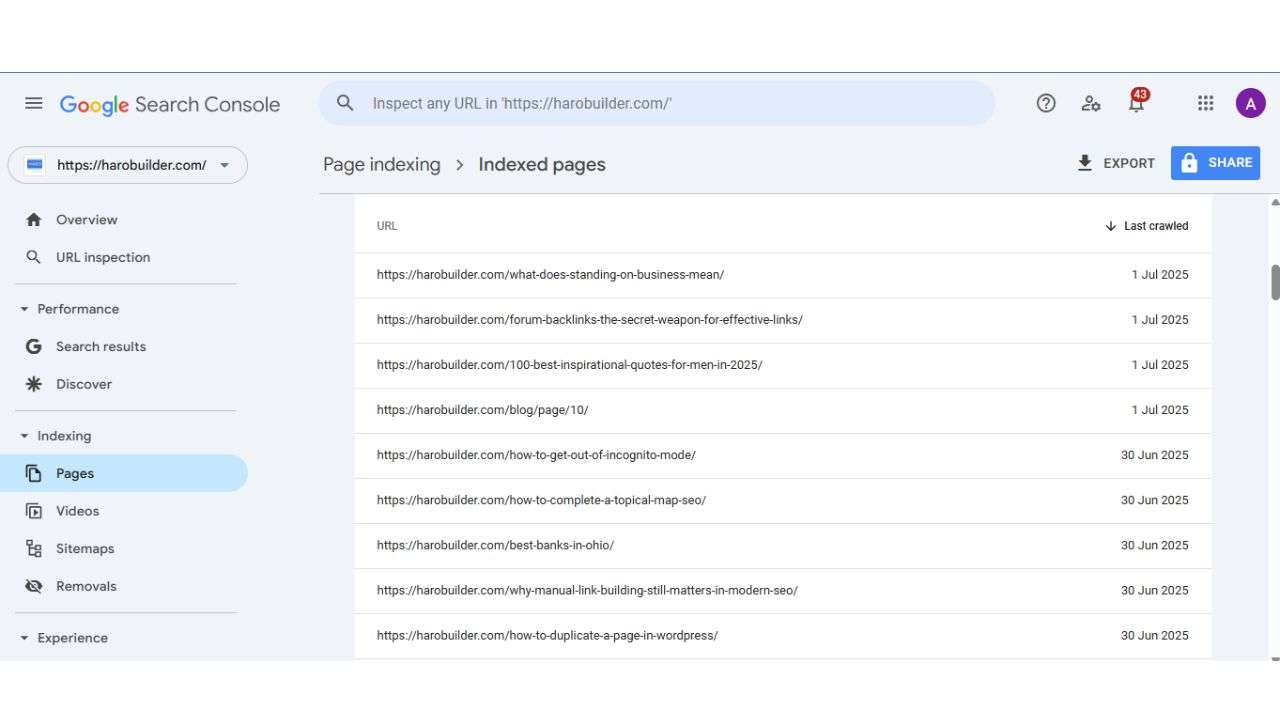
    Google Search Console is a tool for website owners that provides direct data from Google’s indexing systems. It allows you to view all the pages that Google has indexed, as well as those excluded from search results. You can access performance reports, URL inspection tools, and the coverage section to view all the pages of a website.

    Particularly, it’s useful for spotting pages that may have received impressions but are not ranking well. Moreover, this tool helps identify issues with page indexing and shows which URLs were successfully crawled and indexed by Google.

    5. Utilizing Google Analytics:

    Utilizing Google Analytics

    Google Analytics can help you find a list of all your pages that have received traffic over time. Although it doesn’t show every single page automatically, it helps identify pages on your site that users have visited. By viewing behavior flow or all pages under the “Site Content” report, you can extract meaningful insights into pages that matter.

    This method highlights which pages are getting attention and which may be considered orphan pages. Altogether, combining Google Analytics with other tools helps ensure no important pages are missed during a full website audit.

    Conclusion

    Knowing how to find all the pages on a website helps improve structure, indexing, and search engine visibility. Whether you’re planning a website redesign or need to locate orphaned pages, multiple tools can assist you. From checking your sitemap on the website to using Google Search or crawling the entire website, there are many ways to find key URLs. Also, reviewing the robots.txt file and using Webmaster Tools can help you uncover hidden pages. This guide covered some effective ways to see a list of all pages on your website. Which method do you think works best for your specific website?

    FAQs

    1. What is a website crawler used for?
    A website crawler scans all the pages on your site and lists every accessible URL automatically.

    2. How can I find all the pages within my website structure?
    Use tools like Google Search Console or a sitemap on the website to map the internal structure.

    3. Do I need to find orphaned pages during a website audit?
    Yes, you should identify orphaned pages properly to ensure search engines do not overlook them.

    4. Can a sitemap help me see all the pages on the website?
    A sitemap lists all important pages and helps search engines efficiently crawl your website.

    5. What’s the role of the robots.txt file in finding website pages?
    It shows which parts of the website search engines can or cannot crawl, affecting page visibility.

  • How to Do SEO Without Link Building in 2025

    How to Do SEO Without Link Building in 2025

    seo without link building

    Ever wondered why your website struggles in Google search results despite solid on-page SEO and content quality? SEO without link building is achievable when focusing on search engine optimization through technical SEO, internal linking, and content quality. Although quality backlinks remain a powerful ranking factor, you can still rank on Google without backlinks by optimizing meta descriptions, improving site speed, and targeting long-tail keywords. 

    This guide presents a complete framework covering keyword research, on-page SEO, internal linking, CTR optimization, UX, and content reoptimization. You’ll discover how to optimize every aspect that helps search engines understand your page on your website, ensuring strong visibility in the SERP, all without traditional link building.

    Is It Possible To Do SEO Without Link Building?

    The short answer: Yes, it is entirely possible to do SEO without link building, albeit with a strong focus on other SEO elements. While quality backlinks remain a significant ranking factor, websites can still rank on Google without backlinks by optimizing for on-page SEO, improving site speed, and delivering valuable content. Search engines like Google assess various signals, including user experience, content quality, and technical SEO performance.

    By focusing on keyword research, crafting effective meta descriptions, and using long-tail keywords, you can enhance your visibility in the search engine rankings. Additionally, internal linking helps search engines understand the structure and importance of each page on your website.

    Furthermore, creating new content regularly, optimizing for local SEO, and enhancing your click-through rate (CTR) can signal relevance to Google’s algorithm. Thus, it is undoubtedly possible to rank without external links if you strategically improve other core SEO strategies.

    Strategies To Do SEO Without Link Building

    1. Keyword Research:

    Keyword Research

    Keyword research is vital for SEO without link building because it helps match intent with search behavior. Focus on long-tail keywords to improve SEO performance and avoid competitive battles for short, high-volume terms. Search engines like Google reward relevance, so choose terms that answer real user queries. Moreover, optimize content around those terms for better organic traffic and visibility. Content marketing built on research ensures you provide relevant information that users want. Insert keywords naturally in titles, headers, and body content. Targeting the right keyword can help your website without backlinks rank well in search engine rankings.

    2. Topical Authority:

    Topical Authority

    Establishing topical authority is key when you’re pursuing ranking without backlinks. It shows search engines you’re a trusted source on specific topics. Publish content without fluff and focus on depth across related subtopics using targeted keywords. Google’s algorithm recognizes when your site thoroughly covers a niche and rewards it with a better ranking. Additionally, structure your content marketing to answer multiple queries from a single domain. Use consistent internal linking between those pages to signal subject strength. Your site’s visibility and trust improve over time. SEO without link building succeeds when search engines understand your topical depth and relevance.

    3. Internal Linking:

    Internal Linking

    Internal linking is a powerful way to transfer authority across your page on your website. It allows you to pass link equity internally, reducing dependency on quality backlinks. Moreover, well-structured internal links help search engines like Google crawl and index your site more effectively. Use descriptive anchor text with relevant keywords to signal context. Organize links hierarchically to enhance user experience and page relevance. This structure also improves your chances of ranking higher in search engine rankings. If done properly, internal linking increases session duration and SEO performance, helping your website without backlinks rank higher in search results.

    4. Click-Through Rate (CTR) Optimization:

    Optimizing click-through rate (CTR) improves visibility in search results and tells Google’s algorithm your content matches intent. A high percentage of people who click signal relevance and boost your position in the SERP. Use compelling meta descriptions and headlines with emotional triggers and relevant keywords. Add numbers, urgency, or value in titles like “10 Ways to Rank Without Backlinks.” Additionally, include infographics or review stars to visually stand out. The better your CTR, the more users and search engines trust your page. Therefore, CTR optimization is a direct signal that can help you rank well without building external links.

    5. Content Reoptimization:

    Content reoptimization allows you to improve SEO without constantly creating new content or earning quality backlinks. Update underperforming pages with relevant keywords, improved site speed, and better formatting. Compare against current search engine rankings and adjust for readability, depth, and value. Moreover, enhance meta descriptions and headlines to boost click-through rate. Add multimedia like infographics or FAQs to increase engagement and dwell time. Consequently, reoptimized content often performs better than fresh posts. Ensure your content without updates doesn’t stagnate or drop from the first page of Google. This simple tactic greatly boosts SEO performance without relying on external links.

    6. UX Optimization:

    Optimizing user experience (UX) helps you rank higher in search even without backlinks. A website that takes too long to load loses visitors and lowers ranking signals. Therefore, enhance site speed, responsive design, and intuitive navigation for better performance. Use clear CTAs, easy menus, and logical layout to improve user experience. Add visual content, such as infographics, to support reading flow. Search engines like Google monitor bounce rates and interaction metrics when evaluating SEO elements. Hence, great UX gives strong signals to search engines that users value your site. Better UX directly impacts your ability to rank without external efforts.

    Conclusion

    This article shows how strong SEO strategies can let you rank higher in search without link building. By combining technical SEO, purposeful keyword research, and internal linking, you signal relevance to search engines like Google. Optimize CTR, UX, and content quality to boost organic traffic and search engine rankings. Reusing and improving existing content also sustains performance on the first page of Google. Altogether, these SEO elements form a robust system that reduces dependency on quality backlinks. Are you ready to implement these techniques and observe your site’s enhanced visibility in search results?

    FAQs

    1. Can I do SEO without any backlinks at all?
    Yes, by using strong on-page SEO, technical SEO, and writing content without relying on external links.

    2. What helps my site rank if I don’t build links?
    Focus on keyword research, fast site speed, and providing valuable content that matches search intent.

    3. Do search engines care about internal links?
    Yes, internal linking helps search engines understand which pages are important and how they relate to each other.

    4. Is content more important than backlinks now?
    For many sites, yes. Content quality often outweighs link building in certain search engine rankings.

    5. How often should I publish content without links?
    Consistency matters. Creating new content regularly helps improve visibility in Google search results.